
Appearance
Designing a Certificate Template
The certificate is the thing your learners keep. It is what they forward to a licensing board, file for an audit, or pin to a wall — so it is worth more than five minutes, and it is worth getting right once rather than fixing per course.
This guide covers building one. If certificates are already going out and something is wrong with them, Certificate Issues is the faster page.
How the pieces fit together
Three things have to line up, and they live in different places:
- The template — the design, built once under Organization Settings → Certificate Templates. It is shared across every course.
- The credit — each credit points at one template, on the course's Credits tab. This is a required field.
- The completion — when a learner finishes the requirements, the certificate is generated from the template, filled in with that learner's details.
Certificates are generated on demand, not stored
Every time a learner opens their certificate link, it is rendered fresh from the template as it exists right now.
That cuts both ways. Fix a typo in a template and every certificate ever issued from it is corrected, including ones learners downloaded last year — no reissuing. Break something in a template and you break the back catalogue just as thoroughly.
Start from a copy
Every account has at least one Standard Template, supplied by LecturePanda. You cannot edit or delete those — Edit and the delete button are greyed out — but you can copy them, and that is the intended starting point.
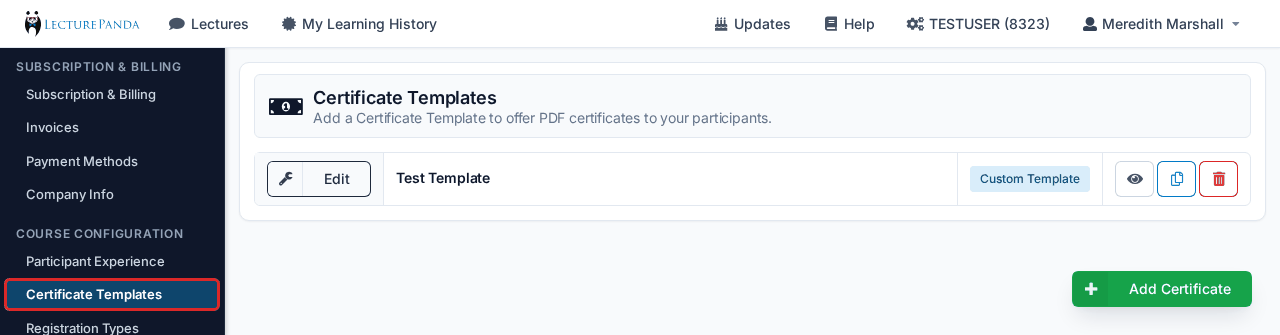
Click the blue copy icon on a template you like. You get an editable duplicate named after the original with - Copy appended, which you rename and change freely. It is labelled Custom Template to distinguish it from the read-only originals.
Copy rather than start from blank
A blank template is a blank page — no borders, no layout, no idea what a finished certificate needs on it. Copying a working design means you are editing something that already prints correctly, and the placeholders are already in place to learn from.
The three settings
Above the editor:
Template Description
The name. It identifies the template in this list and in the dropdown you pick from when setting up a credit — so name it for how you will choose it later ("Pharmacy — Landscape", "Nursing — Portrait"), not what it looks like.
Orientation
Landscape or Portrait.
Paper Size
Letter (US Standard) or A4 (EU Standard).
Set orientation and paper size first
They change the shape of the page your design has to fit. Switching from landscape to portrait after you have laid everything out will reflow it, and usually badly. Decide at the start.
Placeholders
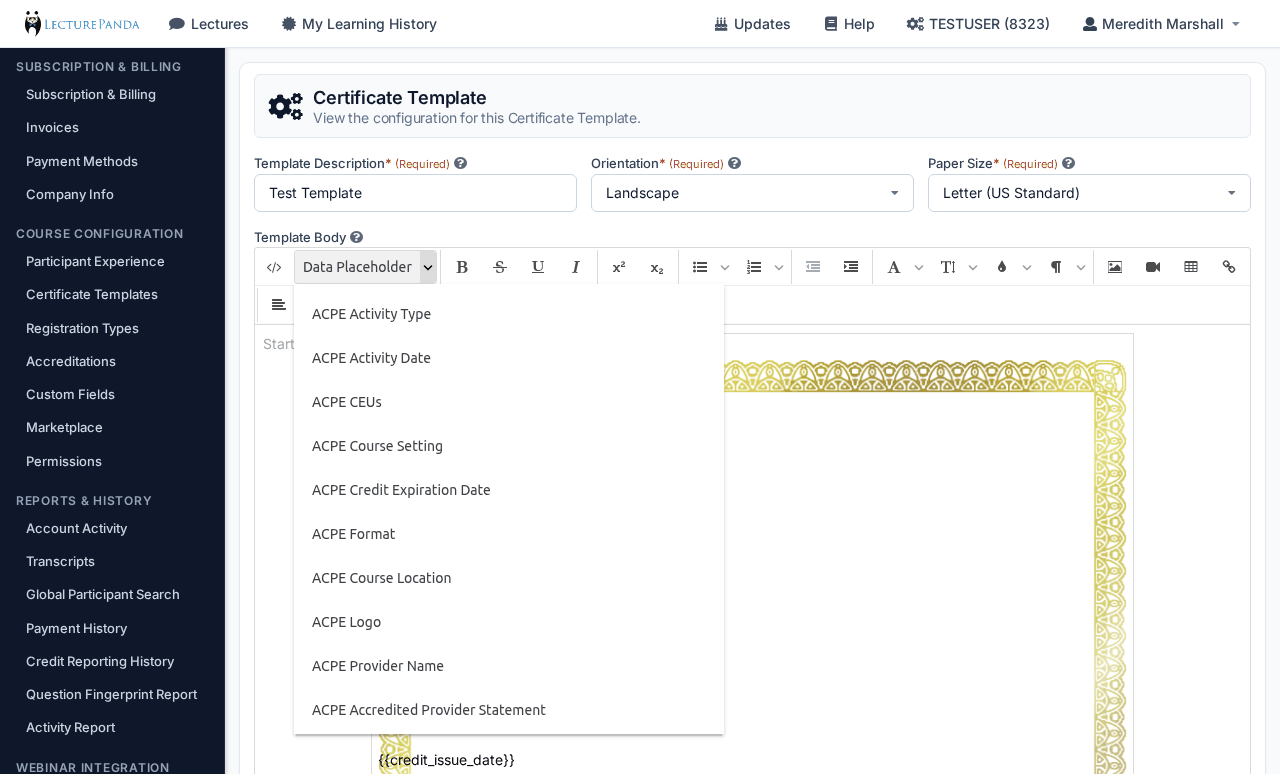
A placeholder is a marker that gets swapped for real data when the certificate is generated. {{participant_name}} becomes Dana Reyes. That is what turns one design into thousands of individual certificates.
Insert them from the toolbar, never by typing. Click the + (Data Placeholder) button and pick from the list.
Never paste a placeholder in from somewhere else
Copying a placeholder from Word, Google Docs, an email, or another browser tab brings invisible formatting markup along with it. That markup lands inside the brackets and stops the substitution working — so the finished certificate prints the literal placeholder text where the learner's name should be, and the preview often looks fine.
If you need the same placeholder twice, insert it twice from the menu.
What's available
| Placeholder | What it renders |
|---|---|
| The learner | |
| Participant Name | The name they registered with |
| Participant Email | Their email address |
| The credit | |
| Credit Description | The credit's name |
| Credit Hours | The CE hours awarded |
| Credit Issue Date | The date this learner earned the credit |
| Credit Session Start/End Date | The session times set on the credit, with or without the time of day |
| The course | |
| Lecture Title | The course title |
| Lecture Speakers | The speaker list |
| Catalog Name | The Publication/Series the course belongs to |
| Lecture Start/End Date | The course's own dates, with or without the time of day |
| Lecture Location Address/Room | The venue |
| ACPE | See ACPE certificates below |
| CE Broker | 20-Number, Profession Code, State, Subject, Board Name |
| Your own questions | Every custom field, marked Custom in the menu |
Dates print in full — Monday August 17, 2026 — and the "and Time" variants add the clock time and timezone.
Your registration questions are placeholders too
Anything you collect on the registration form is available here, listed in the placeholder menu prefixed with Custom. So a licence number, an employer, or a state of practice can print on the certificate without you doing anything extra — as long as you asked for it at registration.
This is the usual answer to "the board wants the licence number on the certificate." Add the question in Custom Fields, attach it to the relevant Registration Type, and it becomes available as a placeholder.
Only for questions you actually asked
A placeholder for a question that a given learner was never asked prints blank. If a certificate has to carry a licence number, make that question required on the registration types that use it.
Get the date right
This is the single most common mistake, and it is invisible until someone complains.
Use Credit Issue Date for a completion certificate. It renders the date each individual learner earned the credit.
Lecture Start Date is the course's date — the same value on every certificate you ever issue for that course. It looks correct while you are building the template, because in a preview any date looks plausible. It is wrong the moment two people finish on different days.
On a course built from modules
The Lecture Start/End Date and Lecture Location placeholders follow the module the credit belongs to: a credit in a Live module prints that module's event dates and venue, not the whole course's. A credit in a Home module, or in a module with no event, prints the course's overall dates. So a certificate for Saturday's session says Saturday, without a second template.
| You want | Use |
|---|---|
| "Completed on…" | Credit Issue Date |
| "This activity was held on…" | Lecture Start Date / Lecture End Date |
| A live session's own time within a conference | Credit Session Start Date |
Home-study courses make the trap obvious: the learner registers in March and finishes in June, while the course's start date is from last year.
Preview before you trust it
Save the template, then click the eye icon in the list. A PDF opens in a new tab with sample values in square brackets — [Participant Name], [Title For Lecture], one credit hour — so you can judge the finished document rather than the editing canvas.
Two reasons this matters more than it sounds:
The preview is your spell-check for placeholders. It is rendered strictly: a placeholder that does not exist stops the preview from opening at all. A real certificate is more forgiving and simply prints nothing in that spot. So a preview that opens is proof your placeholders are all real, and a preview that fails is telling you one of them isn't — which is far better than a learner receiving a certificate with a blank where their name should be.
The PDF is not the editor. It is rendered at a larger scale than the editing canvas shows, so text and images come out bigger than they look while you work. Judge every sizing decision from the preview.
The signature in the preview is not yours
The preview stands in a sample signature image, so do not be alarmed by a stranger's autograph. Real certificates use the signature uploaded on your ACPE accreditation.
Making it fit the page
The certificate is converted from HTML to PDF, which brings a few rules worth knowing before you spend an afternoon on a layout.
- Nothing shrinks to fit. Content wider or taller than the page does not scale down — it spills onto a second page. A certificate that prints as two pages, the second nearly empty, is almost always a few pixels of overflow.
- Use the editor's table button for alignment. Tables hold their shape in the conversion far more reliably than sequences of spaces, tabs, or floated elements.
- Upload images, don't paste them. The image button uploads the file and links it properly. An image pasted from your clipboard or hotlinked from another site may not survive.
- Stick to common fonts. Helvetica, Georgia, Times New Roman, Tahoma, Verdana, Arial, Calibri and Impact are available. Anything else falls back to a default and your spacing changes with it.
- Leave a margin. Home and office printers cannot print to the edge of the sheet. A border sitting flush against the page edge gets clipped on the way out.
Print one before you ship it
Download the preview and actually print it. Colour, margins, and how heavy a background image looks on paper are all things a screen will lie to you about.
ACPE certificates
If you report to ACPE, several placeholders fill themselves from the accreditation you configured under Accreditations — you do not type any of this into the template:
- ACPE Accredited Provider Statement composes the full required sentence for you, dropping in your organization name: "Your Organization is accredited by the Accreditation Council for Pharmacy Education as a provider of continuing pharmacy education."
- ACPE Provider Signature inserts the authorized signature image you uploaded on the accreditation.
- ACPE Logo inserts the official ACPE logo.
- ACPE UAN Number, ACPE CEUs, ACPE Activity Type, ACPE Format, ACPE Course Setting and the release/expiration dates all come from the credit.
ACPE Activity Date is worth understanding: for a home-study activity it renders the date the learner registered, and for a live activity it renders the activity's live date. That is the behavior ACPE expects, and it is handled for you.
If the provider statement comes out with the wrong name
It uses the Organization Name on your ACPE accreditation, not your Company Info. Correct it under Accreditations and every certificate follows, past ones included.
See ACPE / CPE Monitor for the reporting side.
Attach it to a credit
A template does nothing until a credit points at it. This is the step people miss when certificates fail to appear.
- Open the course and go to Credits.
- Edit the credit.
- Choose your template in Certificate Template.
- Save.
Anyone who completes that credit's requirements is offered the certificate on their completion step straight away.
"None" is a valid choice
The dropdown includes None, which means no certificate for that credit. If learners are completing a course and no certificate appears, check this first — see The certificate link is missing.
A sensible workflow
- Copy a Standard Template that is close to what you want.
- Set the description, orientation, and paper size.
- Lay out the fixed text — your organization's name, the wording your accreditor requires, any borders or logos.
- Insert placeholders from the + menu for everything that varies per learner.
- Save, then preview.
- Print the preview.
- Attach it to a credit in a test course, register yourself, complete it, and look at the real certificate.
Step seven is the one worth not skipping. The preview uses sample data; a real completion uses a real name of real length, a real credit-hours value, and your actual accreditation details. That is the first time you see the certificate a learner will see.