
Appearance
Course Modules
Split a course into modules — each with its own dates, place, content and credits — that learners work through one at a time.
This page is for the course builder
Modules are built in the new course builder, which you turn on yourself: click Try the new version at the bottom of a course's menu (or the same entry in your user menu, top right). The switch is yours alone, and Use the classic pages, in the same spot, takes you back at any time. See The Course Builder for the whole menu and where each classic setting went.
A simple course is one unit: its materials, then its credits, then its quizzes. That suits a one-session course, but not a multi-week series, a conference with separate breakout sessions, or a bundle of related sessions you would rather sell as one course.
With modules, you group materials, credits and quizzes into named sections. Each module runs the full learner path on its own — review materials, claim credits, complete evaluations, submit — so a learner can finish Week 1 and collect their certificate for it while Week 2 is still ahead of them.
TIP
Your existing courses are unaffected. A course that existed before modules has one module, named Default, that holds everything it had before — the name is just a name, and you can change it. A course with a single module behaves exactly as it always has, and its learners see exactly what they saw before. There is nothing to migrate.
Learners see "parts"
"Module" is the word in your console only. Everywhere a learner looks, a module is called a part — see What learners see.
Building modules
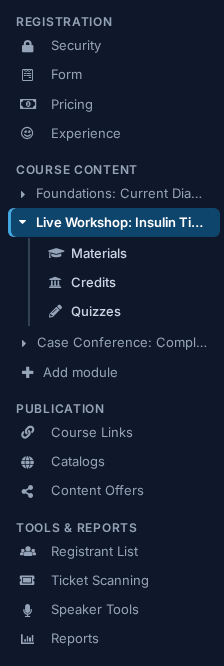
In the course builder, a course's menu has a Course Content group: every module listed by name, in order. The module you are working in is expanded to show its three pages — Materials, Credits and Quizzes — and every other module folds down to its name. Click a module's name to open its settings page.
TIP
A course's only module always stays expanded, so a course that has never used modules looks almost exactly as it always has — Materials, Credits and Quizzes in the menu, now under a Course Content heading. A second module is simply one more group beneath it.
The whole course is laid out — and rearranged — in the Course Outline section of the Course Details page.
Adding a module
Click the + Add module row at the bottom of the Course Content group, or Add module in the corner of the Course Outline on Course Details. Both open the same Add Module dialog.
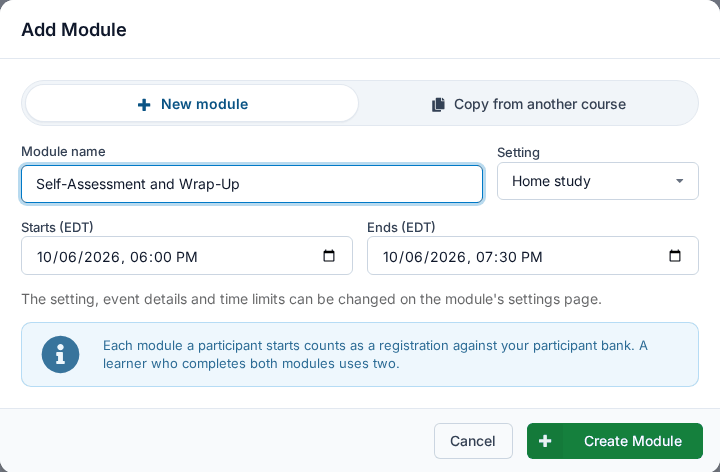
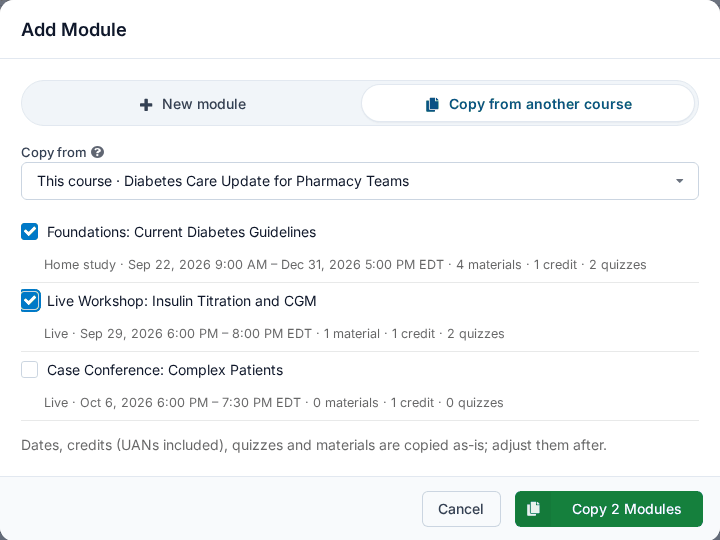
The switch at the top, What to add, has two choices:
- New module asks for the Module name, its Setting, and its Starts and Ends dates. Click Create Module and the new module's settings page opens, where everything else is filled in.
- Copy from another course brings in a module you have already built — see Copying a module.
The dialog also reminds you what a second module costs: "Each module a participant starts counts as a registration against your participant bank. A learner who completes both modules uses two." See Billing.
Module settings
(click the module's name)
One form with one Save, in three sections.
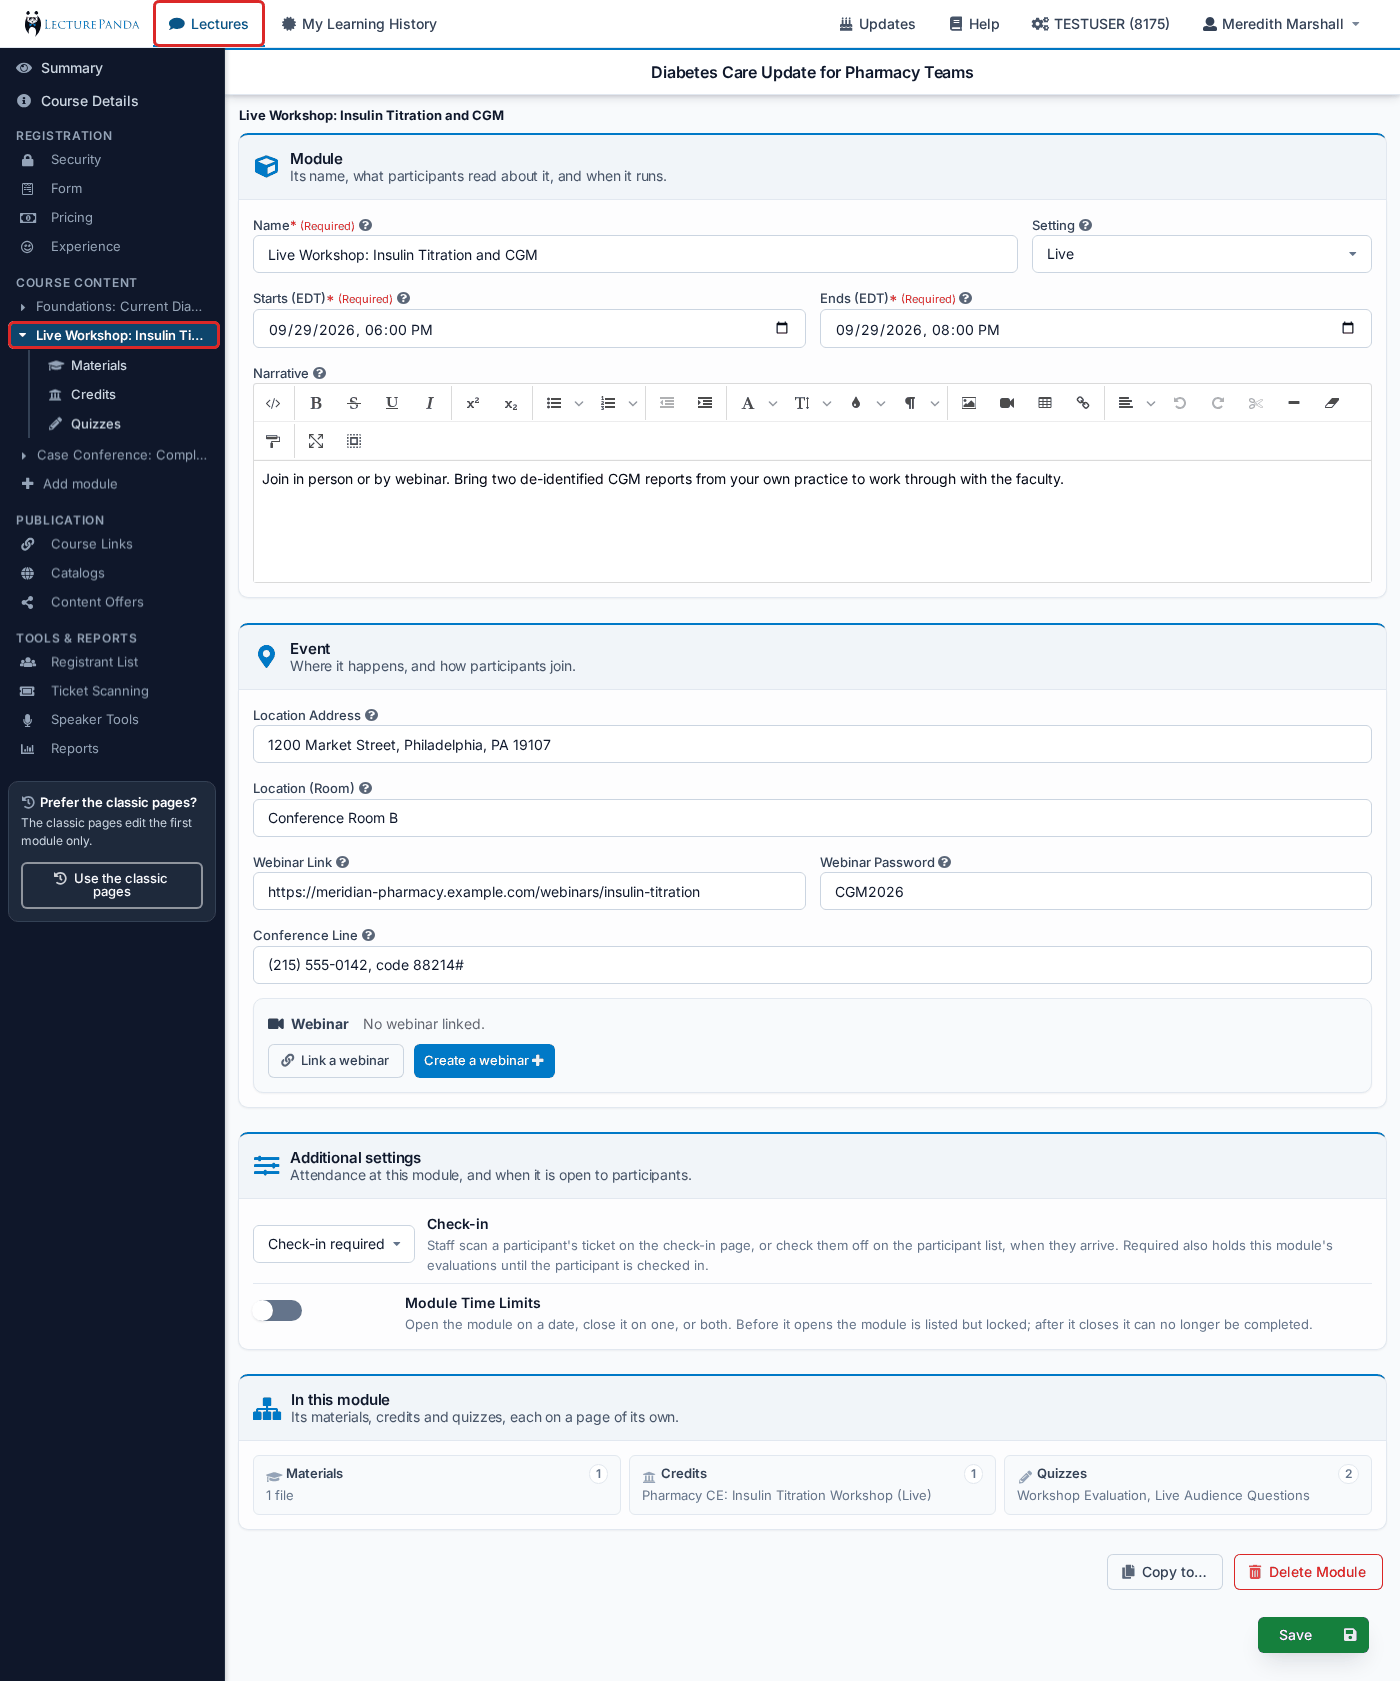
Module — "Its name, what participants read about it, and when it runs."
- Name and Setting, side by side. The setting is Home study, Live or Mixed. A Home study module is pure content. A Live or Mixed module carries an event — a place, a webinar link or a webinar on top of its dates. Mixed is a live event with home study alongside; it behaves exactly as Live does.
- Starts and Ends. Every module has dates. They place the course in lists, reports and certificates, and on a Live or Mixed module they are when the event happens. For a Home study module the end is often the credit's expiration date. These dates never lock materials — that is what Module Time Limits is for.
- Narrative. Optional. What the module covers.
Both the name and the narrative are shown to learners, so name modules the way you want learners to see them ("Week 1: Foundations" rather than "Module 1"). The narrative is the module's blurb — it appears on the part's card and again at the top of the part once a learner opens it.
Event — "Where it happens, and how participants join." Shown on a Live or Mixed module only; a Home study module has no event, so no place, no links and no webinar.
- Location Address and Location (Room). A Same as previous module button copies the place of the nearest earlier Live or Mixed module.
- Webinar Link and Webinar Password — for a link you paste in yourself. They disappear once a webinar is linked below, because each participant then gets their own join link.
- Conference Line.
- The Webinar panel — see Webinars.
Additional settings — "Attendance at this module, and when it is open to participants."
- Check-in — see Check-in.
- Module Time Limits — see Module Time Limits.
Under the form, three tiles — In this module: Materials, Credits and Quizzes — count what the module holds and open the page for each. At the very bottom are Copy to… and Delete Module. Any module can be deleted as long as the course keeps at least one: on a course's only module the button is disabled with "A course needs at least one module." See Deleting a module.
Dates and time limits are two different things
The dates say when the module happens: the event a Live module is built around, or the period a Home study module is dated for. They drive the course's dates on every list and report, the announcement page, the calendar links and reminders. Module Time Limits says when a learner may work on the module, and is optional — leave it off and the module is open for as long as the registration is.
Webinars
(module settings → Event)
Each Live or Mixed module can have its own webinar. With a webinar service connected, the panel offers:
- Link a webinar — one you have already scheduled in the service. The Link an Existing Webinar dialog lists your upcoming webinars, or takes the webinar's ID; click Link Webinar. A linked webinar is never changed by LecturePanda.
- Create in <service> — makes a new webinar from the module's saved name and event times. Save the module's dates first. A created webinar is kept in step when you save the module; if an update fails, it shows here with Sync now.
- Unlink — detaches the webinar without touching it in the service. Participants are no longer registered into it.
Participants are registered into a module's webinar when they start that module, and that is when they get their own join link. On a course with a single module, registering for the course starts it, so they are registered into the webinar straight away. Every module's webinar is its own — there is no course-level webinar apart from the modules'.
Learners get the link on the course page once they have started the part, and in the "starting soon" email about an hour before the session. Confirmation emails never carry a join link. See Emails LecturePanda Sends.
Check-in
(module settings → Additional settings)
Check-in is set on each module, Home study or Live:
- No check-in — the default.
- Check-in optional — staff can check participants in; nobody is held up if they are not.
- Check-in required — as above, and this module's evaluations are held until the participant is checked in.
Staff scan a participant's ticket on Tools & Reports › Ticket Scanning, or check them off on the Registrant List. Check-in works the same way on every module. When any module takes check-in, the scanning page shows a Checking in to picker listing each module that does — the first module included, there is no separate "Course" entry — and remembers your choice for that course. A course with one such module has it picked already.
The classic Details tab's Select Check-in Process is the first module's check-in setting (first in the Course Outline order), and the check-in column on the classic Participant List and in the export reflects a check-in to the first module.
Checking someone in can start the module for them
If a participant has not started the module you check them in to, the check-in starts it for them — their ticket is their Start. That is billed like any other start (see Billing), and if your participant bank is empty the check-in is refused until you add participants. Un-checking someone in does not reverse it.
Module Time Limits
(module settings → Additional settings)
Turn on Module Time Limits — it works the same way as the Registration window rule on Registration › Security — to reveal Module Opens On and Module Closes On. Set either or both. Before it opens, the module is listed for learners but locked, with the date it opens; after it closes, it can no longer be completed. This is what makes scheduled multi-week courses work, and it is available on every module. It is independent of the module's dates: a Live module held on the 8th can be open to learners from the 1st to the 30th.
Materials
A module's materials are a single ordered list — "Files, videos, pages, PowerPoints, Tracked PDFs and xAPI packages. Drag to set the order participants meet them."
Click Add Material — in the corner of the section, or the green button floating at the bottom right — and choose Add HTML Material, Add Video, Upload File, Add xAPI (Tin Can) Module, Add PowerPoint or Add Tracked PDF. Each opens its form in a dialog over the list. Arrange the list in whatever order you like — a reading, then a video, then a handout, then another reading — by dragging a row by its handle. The order is saved as you drop.
TIP
The order here is exactly the order learners meet the content. Each row leads with an icon for its type — text, video, file or interactive package — so you can read a mixed list at a glance, and clicking a row opens it: text and videos open their editor, and a file downloads. Neighbouring items of the same type render as one section on the learner page: one "Files For Download" box for a run of files, for example, while each video gets a row of its own.
A file belongs to the module whose Materials page it was uploaded on. The fields of each kind of material are described on the Materials page, and PowerPoints and Tracked PDFs have pages of their own: PowerPoint Presentations and Tracked PDFs.
Interactive (xAPI) packages work like videos: each one is Required To Continue or optional, set on the package's own page (click its row). A required package must be completed before the module completes, and required videos and packages are completed one by one, in the order you list them — a required package below a required video unlocks when the video is watched, and a required video below a required package unlocks when the package is passed. Optional items never lock and never hold anything up. A newly uploaded package is required.
PowerPoints join the same chain. A PowerPoint marked Required to continue is complete once the learner has viewed every slide, and required items below it unlock then. See PowerPoint Presentations.
Tracked PDFs join it too. A Tracked PDF marked Required to continue is complete once the learner has had it open for its minimum time, and required items below it unlock then. A PDF added with Upload File is a download and never holds anything up. See Tracked PDFs.
TIP
A package's title and description come from its tincan.xml at upload, but you can change both on the package's page without rebuilding or re-uploading the package. The description shows under the package's name on the learner's page.
INFO
Courses built before per-package rules keep the older module-wide rule they were built with — any one package or every package, in order or not — and a line under the module's materials says which one is in effect. Click Use per-package rules there to switch: every package in that module becomes required, and you can then make any of them optional on its page. Uploading a new package into that module switches it too.
"Module" has an older meaning too
An xAPI (Tin Can) package is also called a "module" in places — Add xAPI (Tin Can) Module here, Learning Modules on the learner's page, and throughout the xAPI authoring guide. That is the long-standing name for an interactive package. It is a kind of material, and it lives inside a course module.
Credits and Quizzes
Each is a list with the same controls the classic Credits and Quizzes tabs have — claim codes, responses, the Word export, duplicate and delete — and the same forms. Drag a row by its handle to reorder. Credits and quizzes are created from inside the module they belong to, so there is nothing to assign afterwards — each one belongs to exactly the module you built it in, and to no more than one. The form says so at the top: "Adding to <module>".
Add Credit opens the usual credit form. Add Quiz offers two routes: a New Quiz, or Copy From Another Course to pick one you have already built elsewhere. Either way the item is created in the module you started from, and saving returns you to that module's page. The same actions also float in the bottom-right corner — Add Credit on the Credits page, Copy Quiz and Add Quiz on the Quizzes page.
A speaker chosen on a module's credit is shown against that module in the Course Outline and on the speaker's row on Course Details. That is the only link between a speaker and a module — there is nothing else to set.
Reordering modules
On Course Details, click Reorder in the head of the Course Outline. Up and down arrows appear on every module; move them, then click Done. Every module needs dates before a new order can be saved — a module still missing them is flagged Needs dates.
Within a module, materials, credits and quizzes all reorder by dragging.
Completed in order
In the head of the same Course Outline section is a Completed in order switch, shown once the course has more than one module.
- Off — learners take the modules in any order, and may skip any of them.
- On — a learner can only start a module once every module before it in the outline is complete. A module a learner has already started stays open to them.
Copying a module
There are two ways to copy a module, and they do the same thing from opposite ends.
- Into this course — in the Add Module dialog, choose Copy from another course. Pick the course under Copy from (this course's own modules are offered first, so you can duplicate one in place), tick one or more of its modules — each is listed with its setting, dates and a summary of its content — and click Copy Module.
- Out to another course — on the module's settings page, click Copy to… at the bottom. In the Copy Module dialog choose the course under Copy to (or this course, to duplicate the module where it is) and, if you like, change the Name of the copy. A copy made inside the same course is named "<name> (copy)" unless you say otherwise.
Either way: "Dates, credits (UANs included), quizzes and materials are copied as-is; adjust them after." Check the copy's dates and its credits' UANs before learners see it.
Deleting a module
Click Delete Module at the bottom of the module's settings page. The confirmation says what happens: "Its materials, credits and quizzes go with it. Learners lose access to this module. Support can restore a deleted module."
- The module's materials, credits and quizzes leave with it — they do not move to another module.
- Learners no longer see the part, and cannot open anything in it.
- Nothing is destroyed: a deleted module is kept out of sight, and support can put it back, whole, if you ask.
- One place still lists them: the classic Credits and Quizzes tabs show every credit and quiz the course has, so a deleted module's stay in those lists (learners never see them). Delete the credit or quiz itself there if you want it gone for good.
Any module can be deleted, including the first one, as long as the course keeps at least one. On a course's only module the button is disabled with "A course needs at least one module." If you delete the first module, the next one in the outline becomes the first — see The first module for what that changes.
Completing a course
There is no "required" or "optional" setting on a module. Modules are all optional, the way credits are:
- A learner's course is complete when every module they started is complete. A module they never started does not hold them back.
- On a course with Completed in order on, the sequence is the course, so every listed module counts.
INFO
There is no per-module publish or draft state. Publishing is the course's own publication — the catalog publish — and it is all or nothing: when the course is published, every module in it is live.
Billing
Modules are billed from your participant bank, the same bank registrations use — see How Billing Works.
- A registration uses one participant, as it always has.
- The first module a learner starts is included in that registration.
- Each further module the learner starts uses one more participant. A learner who registers and starts three modules uses three.
A module counts when it is started — the learner clicking Start This Part, or staff checking them in to it — not when it is completed. A module a learner never starts costs nothing, so a course with ten modules does not cost ten participants per learner unless they take all ten. A course with a single module costs exactly what it always did.
When you are logged in and register yourself — with an email address on your own LecturePanda account — the modules you start on that test registration do not use the bank. Starting a module on a real learner's registration does. How Billing Works has a worked example.
If the bank runs out
A learner who tries to start a further module with your bank empty is stopped with "Part Start Blocked" and told to contact you; a check-in that would start a module is refused the same way. Nothing they have already started is affected. Add participants under Subscription & Billing and they can carry on.
The course's dates, setting and place
A course no longer has dates of its own to enter. Its dates, its setting and its place are worked out from its modules every time a module is saved:
- Dates — the earliest module start and the latest module end.
- Setting — Home when every module is Home study, Live when every module is Live, and Mixed otherwise (any Mixed module, or Home study and Live modules side by side). Wherever it matters, Mixed is treated as Live.
- Place — the venue and room of the first Live or Mixed module, in outline order, that has one. A course whose first Live module is online and whose second is in a hall shows the hall.
These derived values are what the lecture list filters and sorts on, what catalog listings, reports and exports show, what heads the announcement page and the announcement email, and what the certificate address tokens print. Add Lecture still asks for a setting, a start, an end and a time zone: the setting and dates become the new course's one module's — it is named Module 1 until you rename it — and the time zone stays on the course — it is the course's clock, and every module reads it. The time zone is edited on Course Details.
The Summary page
In the course builder a course's Summary is a read-only overview: the numbers, whether it is published and open for registration, and one card each for Registration, Course Content and Publication. The Course Content card lists every module with its setting, its dates and what it holds, and each row opens that module. See Summary.
The first module
There is no special module. Every module is an ordinary module: rename it on its settings page, move it anywhere in the outline, set it Live, Mixed or Home study, give it its own dates, place, webinar and check-in, copy it, and delete it (as long as one module remains). A course always has at least one.
What does matter is which module is first in the Course Outline order, because that is the module the classic pages reach:
- The classic Details tab's event fields — setting, dates, place, webinar link and password, conference line, the webinar panel, Select Check-in Process and the xAPI completion rules — edit the first module. Everything else on Details, and all of Registration Security, belongs to the course.
- A credit or quiz created from the classic Credits or Quizzes tab, which do not ask for a module, lands in the first module.
- The check-in column on the classic Participant List, and course-level check-in in the export, reflect a check-in to the first module.
Reorder the modules and the classic pages follow — whichever module you move to the top is the one they edit.
A brand-new course starts with one module named Module 1. A course that existed before modules has its first module named Default — that is only its name, given when the course was carried over, and it can be renamed like any other. Its materials keep the classic layout — text, then files, then videos, then interactive modules — until the first time you drag them into a new order; after that, the order you set is what learners see.
This is why an existing course keeps working untouched: everything in it sits in its one module, and a course with a single module renders for learners exactly as it always has.
The classic pages edit the first module only
If you switch back with Use the classic pages, the Details tab's event fields are the first module's, and the Materials, Credits and Quizzes tabs show what the first module holds. Other modules are untouched and learners are unaffected, but you cannot edit them until you switch back. The classic Materials, Credits and Quizzes tabs show a grey note — "… live in modules — edit them under Course Content." — when other modules hold content.
What learners see
INFO
Learners never see the word "module". Everywhere a learner looks — the course page, the announcement page, error messages and emails — a module is called a part: the list is headed Parts, the buttons read Start This Part, Open This Part and Review This Part, and the way back is All Parts. "Modules" is the word in your console only. (The Learning Modules section learners see inside a part is something else: it is the long-standing name for interactive xAPI packages, and it has not changed.)
A course with modules opens on a list of its Parts instead of going straight into the materials. Each part shows its name and narrative, how many credits it carries, and the learner's progress through it — Not started, In progress, or Complete. Parts that have not opened yet show the date they will ("This part is not available yet."), and a part past its Module Closes On date can no longer be completed.
A Live module's card also carries its event: its dates, its place with a map link, its conference line, an Add to calendar link, and — once the learner has started the part — its Join The Webinar button, with Interactive Questions beside it when the module has live questions. The timing that used to belong to the course now belongs to the module: a pre-test closes fifteen minutes after that module's event starts, and the module's submit step stays closed until its event has begun (or ended, for grouped credit hours). A Home study module has no event on its card and no timing gate.
Learners start a part explicitly (Start This Part), work through its steps, and return to the list (All Parts). When they finish one, they are offered the next available part. Inside a module, finishing a required video or interactive package shows an Up next button over the item just completed whenever the next item in the list is a video or a package — one click scrolls to it. On a course that must be completed in order, a part whose predecessors are not yet done shows "Complete <part name> first" on its card in place of the Start button.
INFO
A course with exactly one module — whichever module it is, including a course that has never used modules — skips the list entirely and opens directly into the learner flow, exactly as before, with that module's event at the top.
Certificates
When a learner earns a certificate, it appears on that module's card on the course page. They can download it from there without re-entering the module and paging through to the end.
Dates on certificates and in credit reports
The date of activity on a certificate, and the date reported to ACPE, CE Broker and the other accreditation services, follows the credit: the credit's own session dates when you have set them, otherwise the event of the module the credit belongs to, otherwise the course's dates. A credit in a Home study module reports the moment the learner completed it, as a Home course always has. The certificate's address and room tokens print the course's derived place (the first Live module with one).
The announcement page
The public course description page reads the course's derived dates, setting and place for its headline. When the course shows learners more than one module, the page adds a Parts section — a Home study module is a part of the course, not an appointment, which is why it is not called a schedule — listing each module in order with its name, its own dates in the timezone the visitor has picked, its place with a map link, its conference line, and its own Add to calendar links. The agenda beneath is grouped by part, each credit under the module it belongs to (a credit added from the classic Credits tab belongs to the first module). A course with one module keeps the single When/Where block and credit-time agenda it always had.
Join links and webinar passwords are never on the announcement page, however the course is built — the page is public. A Live module that has a webinar or a link says "details provided upon registration"; the link itself reaches the learner on the course page once they have started that part, and in the "starting soon" email sent about an hour before the session.
Reminder emails
Learners on a modular course receive one reminder email per course, not one per module. The email lists each module under Parts awaiting your attention along with the learner's status in it; a part they have not started carries a Start this part link that opens the course page on that part. Following a link from an email never starts a part — starting is always the learner's own click on the course page.
Each module keeps its own clock, and the learner gets one weekly rhythm. A module's clock starts when there is something for the learner to finish — after its session ends for a Live module, otherwise when it becomes available (its open date, or the course's usual starting point if it has none) — and it stops as soon as the learner completes the module, its window closes, or 60 days pass. The weekly email follows the earliest clock still running, so modules that opened on different days never add up to several emails a week.
Modules are optional, so a module the learner never started is listed in the email but is never the reason one is sent. The exception is a learner who has started nothing at all: they get the weekly email too, worded as "You haven't started yet".
TIP
A module that opens partway through a course starts its own clock on its open date, and that first message doubles as the notice that it has opened — the learner reads "<part name> is now open." There is no separate notification to set up.
Calendar entries follow the modules too. The Add to calendar links on the announcement and course pages, and the .ics attached to a catalog's announcement email, carry one entry per Live module — each with its own name, dates and place. A course with no Live module gets one entry over its dates. The catalog's own calendar feed stays one entry per course.
Copying a course
Copying a course copies its modules along with their materials, credits and quizzes, remapped to the new course. The source's first module is copied like any other, and if you have rearranged its materials the copy keeps that order too. If an item could not be copied, it is left out of the module rather than pointing at the original course.