
Appearance
Course Details
What the course is called, what it says about itself, who delivers it, and the modules it is made of.
This page is for the course builder
It describes the Course Details page you see after switching with Try the new version. On the classic pages the same information is on the Details and Speakers tabs. See The Course Builder for the full map.
Course Details reads from top to bottom the way a course is written: the course itself, then its speakers, then its outline.
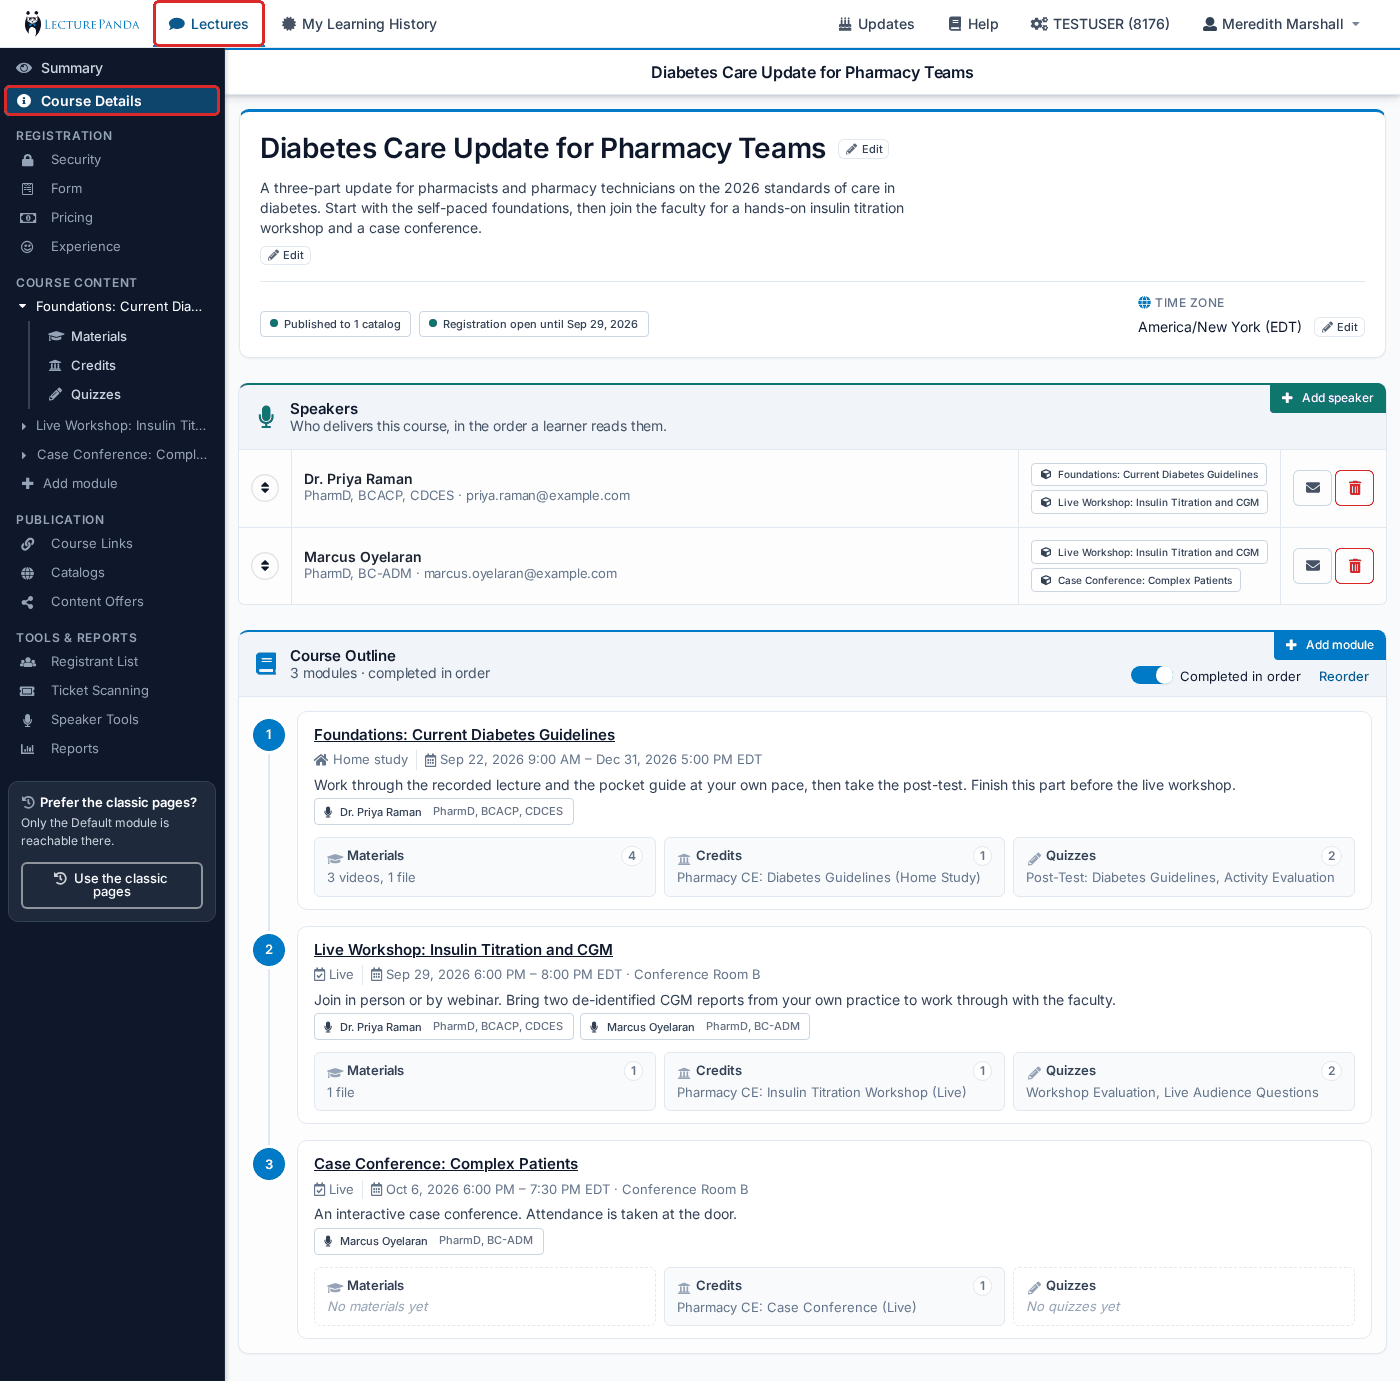
The course
The band at the top holds the things that name the course. Each one is edited in place: click Edit beside it, change the value, and click Save (or Cancel). On a single-line field, Enter saves and Escape cancels.
Title
Identifies the course. It is used on the announcement page, in emails, on registration forms and on certificates.
Description
Straight under the title. Optional. What participants read about this course on the announcement page and in reminder emails; it is also shown in catalog listings. Edit opens the rich text editor in place.
Time zone
The clock every date on the course is entered against — the course's and every module's.
Two chips beside the time zone say whether the course is published and whether registration is open. They are readings, not controls: publishing is done on Publication › Catalogs, and the registration window on Registration › Security.
Looking for the dates, the setting or the location?
They belong to the course's modules. Open a module under Course Content to set its Setting, Starts and Ends, and — on a Live or Mixed module — its Event details. The course's own dates, setting and place on lists, reports and the announcement page are worked out from its modules. See Course Modules.
Looking for registration types or topics?
Registration types are on Registration › Form, in the Audience section. Topics are on Publication › Catalogs.
Speakers
"Who delivers this course, in the order a learner reads them."
- Adding a speaker — click Add speaker in the corner of the section. The dialog asks for the speaker's Name, Email Address, Title, Speaker Photo and Speaker Bio. Click Add Speaker. You are then asked whether to send the speaker their introductory email, which carries the link to their Audience Response page.
- Editing a speaker — click the speaker's row. The dialog's buttons are Save Speaker and Resend email.
- Resending the email — the mail button on the row resends the introductory email to that speaker.
- Removing a speaker — click Remove on the row and confirm.
- Reordering — drag a row by its handle. The order is saved as you drop, and it is the order learners see.
A speaker's row also shows a small tag for each module they are connected to. A speaker is connected to a module by being chosen on one of that module's credits — there is nothing else to set.
The links a speaker uses during a live session, and the Speaker Files you keep for your records, are on Tools & Reports › Speaker Tools.
Course Outline
The outline lists the course's modules as a numbered list, in the order learners meet them. Each module shows:
- its name — click it to open the module's settings page;
- a Needs dates warning if the module is still missing its dates;
- a tag when the module has time limits — Opens date, Closes date, or Available date – date;
- its setting (Home study, Live or Mixed) and its dates — with the room, on a module that has one;
- its speakers;
- three tiles — Materials, Credits and Quizzes — counting and naming what the module holds. Click a tile to open that page of the module.
The section's controls:
- Add module (in the corner) opens the Add Module dialog — the same one the + Add module row in the menu opens. See Adding a module.
- Reorder (once the course has more than one module) puts up and down arrows on every module. Move the modules, then click Done. Every module needs dates before the order can be saved — that is what the Needs dates warning is pointing at.
- Completed in order (also only with more than one module) — turn it on and a learner can only start a module once every module before it is complete. Off, the modules can be taken in any order. See Completed in order.
Related
- Course Modules — everything about modules: settings, content, check-in, copying and billing
- Details — the classic page, for the meaning of each event field