
Appearance
Credits
Define the credits and certifications that can be awarded to your attendees upon completion.
Not the same as participant credits
The credits on this page are what a learner earns — CE hours, certifications, badges. The participants you buy to cover registrations are a billing unit and unrelated; see How Billing Works.
This page describes the classic pages
In the new course builder, credits belong to a module: open the module under Course Content and click Credits — see Course Modules. The credit form is the same one described below. A banner at the top — Adding to <module> — names the module the credit will belong to; participants claim it while working through that module. Rows are dragged into order there.
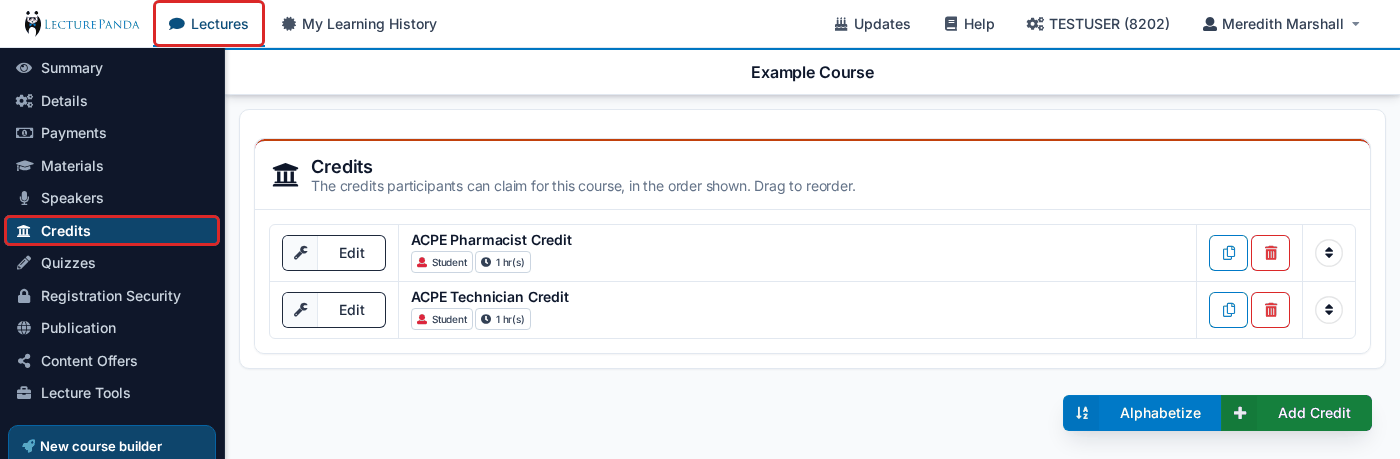
Creating a Credit
Use the green "+ Add Credit" button to create a new credit.
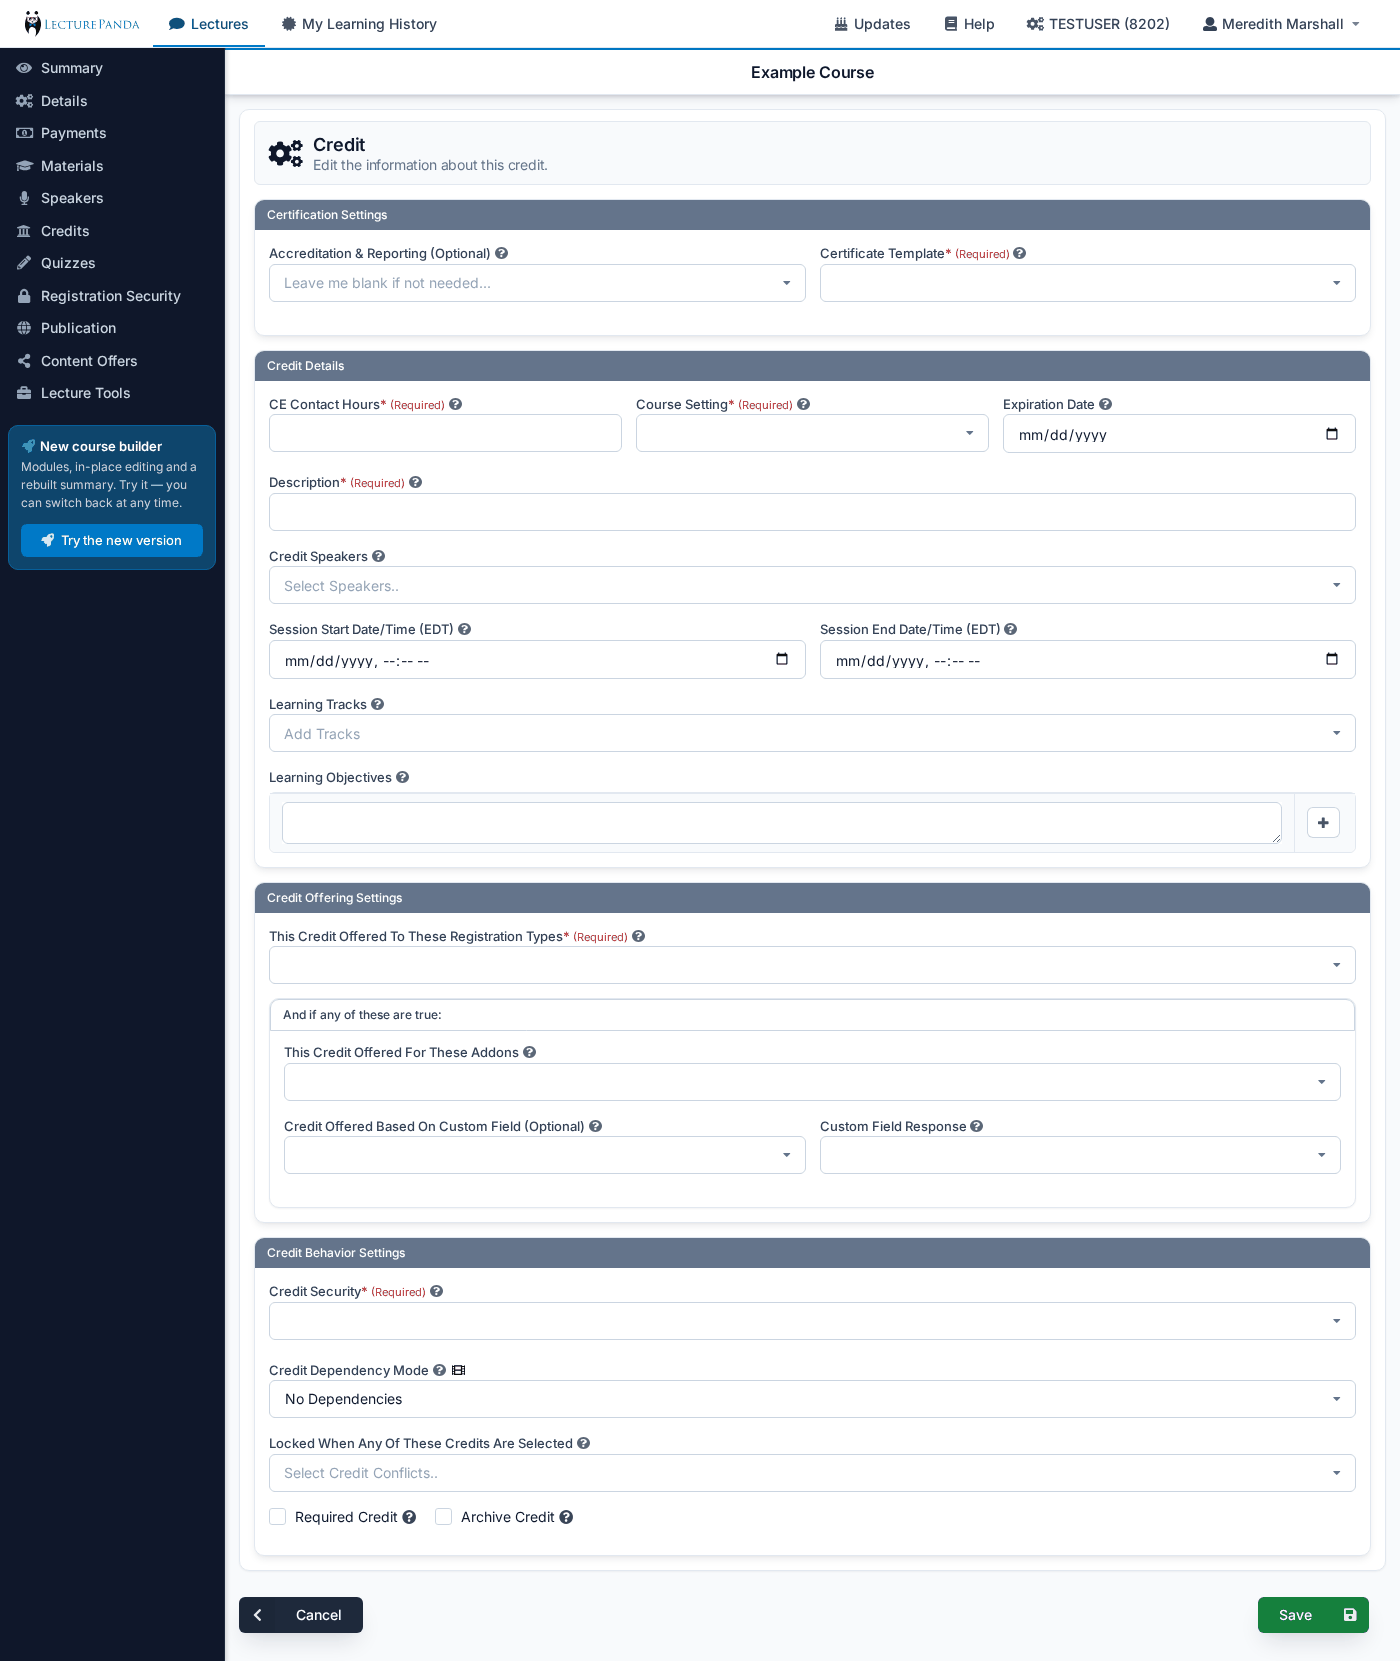
Accreditation & Reporting (Optional)
Attach one or more of your configured accreditation connections to this credit, and completions report automatically when a learner claims it.
Leave it blank if you award your own certificates. The credit, the certificate, and the completion record all work the same way either way — this field only adds outbound reporting on top.
The field appears once your organization has at least one accreditation set up under Organization Settings → Accreditations. It accepts more than one, so a single credit can report to two places from one learner action — an ACPE submission and a CE Broker submission together, for example.
TIP
See Accreditation & Reporting for what can be connected — ACPE, CE Broker, ACCME PARS, Credly and Badgr badges, or your own accreditation statement.
For ACPE credits
Selecting an ACPE accreditation adds a field for the activity's UAN. Enter it and the rest of the credit fills itself in from CPE Monitor — description, CE contact hours, release and expiration dates, course setting, format, and the activity's live dates. See UANs & Live Dates.
Adding an ACPE accreditation also means each learner's NABP e-Profile ID and date of birth are validated as they register — see Learner Validation.
Certificate Template
Select which certificate will be awarded upon completion. You can create custom certificate templates here.
CE Contact Hours
The number of continuing education contact hours earned by claiming this credit. Filled in automatically for ACPE credits once you enter the UAN.
Course Setting
Live or Home. This must match the lecture's own setting — on the Details tab or, in the course builder, the Setting on the module's settings page. When that setting is Mixed, choose whichever describes this credit: Live for a session people attend, Home for self-paced work.
Expiration Date
The date after which this credit can no longer be claimed. ACPE credits inherit this from the UAN.
Enforcing a deadline to complete
There's no setting that closes a learner's profile a fixed period after they register — that's in development. Until then, an expiration date on the credit is how most organizations enforce a completion window, which is what you want for annual recertification training where a stale completion shouldn't produce valid CE.
Description
A short label for this credit — "Afternoon Session", "Track B: Oncology". Participants see it when choosing which credits to claim, so on a multi-session course it's what tells them which session is which.
Credit Speakers
Optional. Attaches speakers to this credit so the association shows on your announcement page.
Speakers appearing twice on the announcement
A speaker attached to a credit appears in the agenda under their own session. A speaker attached to no credit appears in the preview block at the top instead — which is why some announcement pages seem to list the same people twice. Attach every speaker to their credit and the duplicates resolve.
Session Start and End Times
Enter the start and end times/dates for this session. In this way, a single lecture can consist of multiple sessions.
Overlapping sessions lock each other
Start times are inclusive and end times exclusive, so 10:00–11:00 and 11:00–12:00 are back-to-back rather than overlapping — enter them exactly like that. Credits that genuinely overlap can't both be claimed, which is the usual reason a learner can only claim one credit on a conference. See Running a Live Event.
Learning Tracks
Optional. The tracks this credit belongs to. Participants can filter the credit list by track, which is worth setting up once a course carries enough sessions that scrolling the list becomes work.
Learning Objectives
Information entered here will display on the lecture announcement and be visible to participants.
TIP
You can copy and paste a list of pre-written learning objectives to enter multiple objectives at once.
This Credit Offered To These Registration Types
Select which Registration Types can see and claim this credit.
This Credit Offered For These Addons
Optional. Restricts the credit to participants who purchased the selected add-ons — the mechanism behind a pre-conference workshop or a paid optional session.
Credit Offered Based On Custom Field (Optional)
Optional. Offers the credit only to participants who answered a particular registration question a particular way. Pick the field here and the qualifying answer in Custom Field Response. Leave it blank to disable the filter.
Credit Security
Select a credit security option.
- No Security: Attendees do not need to enter a claim code to receive their credit.
- Single Code: All attendees will use the same claim code to receive their credit.
- Double Code: Two codes for the session — one released at the start, one at the end. Attendees must enter both, which verifies they were present for the whole session. This is the digital equivalent of a sign-in/sign-out sheet.
- Multiple Codes: Each attendee will use a unique claim code to receive their credit.
TIP
Sharing the security code at the end of a lecture is a good way to ensure that your attendees have watched the entire live lecture before receiving credit. See Running a Live Event or Conference for choosing between the options.
Claim Code
Define the Credit Security claim code.
- With No Security: This feature will not be available.
- With Single Code: This code can be manually written or automatically generated.
- With Double Code: Two fields appear, Claim Code 1 and Claim Code 2. Release the first at the start of the session and the second at the end.
- With Multiple Codes: Select the number of claim codes you will need. After that, use the “Manage Credit Codes” button to review and distribute codes.
Credit Dependency Mode
Controls whether this credit can be claimed on its own, or only once other credits have been. Leave it on No Dependencies unless you're building a program where one credit represents finishing several others.
- No Dependencies (default): the credit is claimed directly.
- Locked: the credit stays locked until every credit listed as a dependency has been claimed, then becomes selectable.
- Auto-Claim: the same, except the credit selects itself rather than waiting to be picked. Use this for a program-completion credit that should be awarded the moment its components are done.
- Grouped-Hours: the credit auto-selects once the learner has claimed a Minimum Component Hours total across the listed dependencies — for a certificate that requires 10 hours from a pool of sessions, rather than a specific set of them.
Choosing anything other than No Dependencies reveals Credit Auto-Claim Dependencies, where you pick the credits that count toward it.
Locked When Any Of These Credits Are Selected
Makes this credit unclaimable when the learner has selected any of the credits you list — a manual conflict, on top of the automatic one that already applies to credits with overlapping session times.
Conflicts are one-way
Adding credit B here on credit A stops B's holders from claiming A, but not the reverse. For a true either/or pair, add the restriction to both credits.
Required Credit
Forces this credit to be selected before the learner can move past the Select Credits step. By default a learner only has to pick at least one credit, choosing whichever sessions they attended; mark a credit required when it's the one everybody must take.
Archive Credit
Hides the credit from all participants and puts it into an archived state, leaving its existing completions untouched. Useful on a course that has accumulated many live dates over time.
Managing Credits
On the classic Credits tab, Alphabetize sorts the list of credits by name. If a course has had modules added in the course builder, the tab lists only the first module's credits (first in the Course Outline order); a grey note — for example 2 credits live in modules — edit them under Course Content. — says how many more there are. A credit added from this tab goes into the first module.