
Appearance
Payments
Set the registration fee for each participant. Payment rules act as a funnel that all registrants pass through. The first rule to pertain to a registrant will be applied; therefore, the sequence of your payment rules is important. To ensure that the correct price is applied to each registrant, we recommend that your payment rules start with the most specific rules and end with a catch-all rule.
Payments and Pricing are the same page
On the classic pages this is the Payments tab. In the new course builder it is Registration › Pricing. The page is the same one in both, so everything below applies to either.
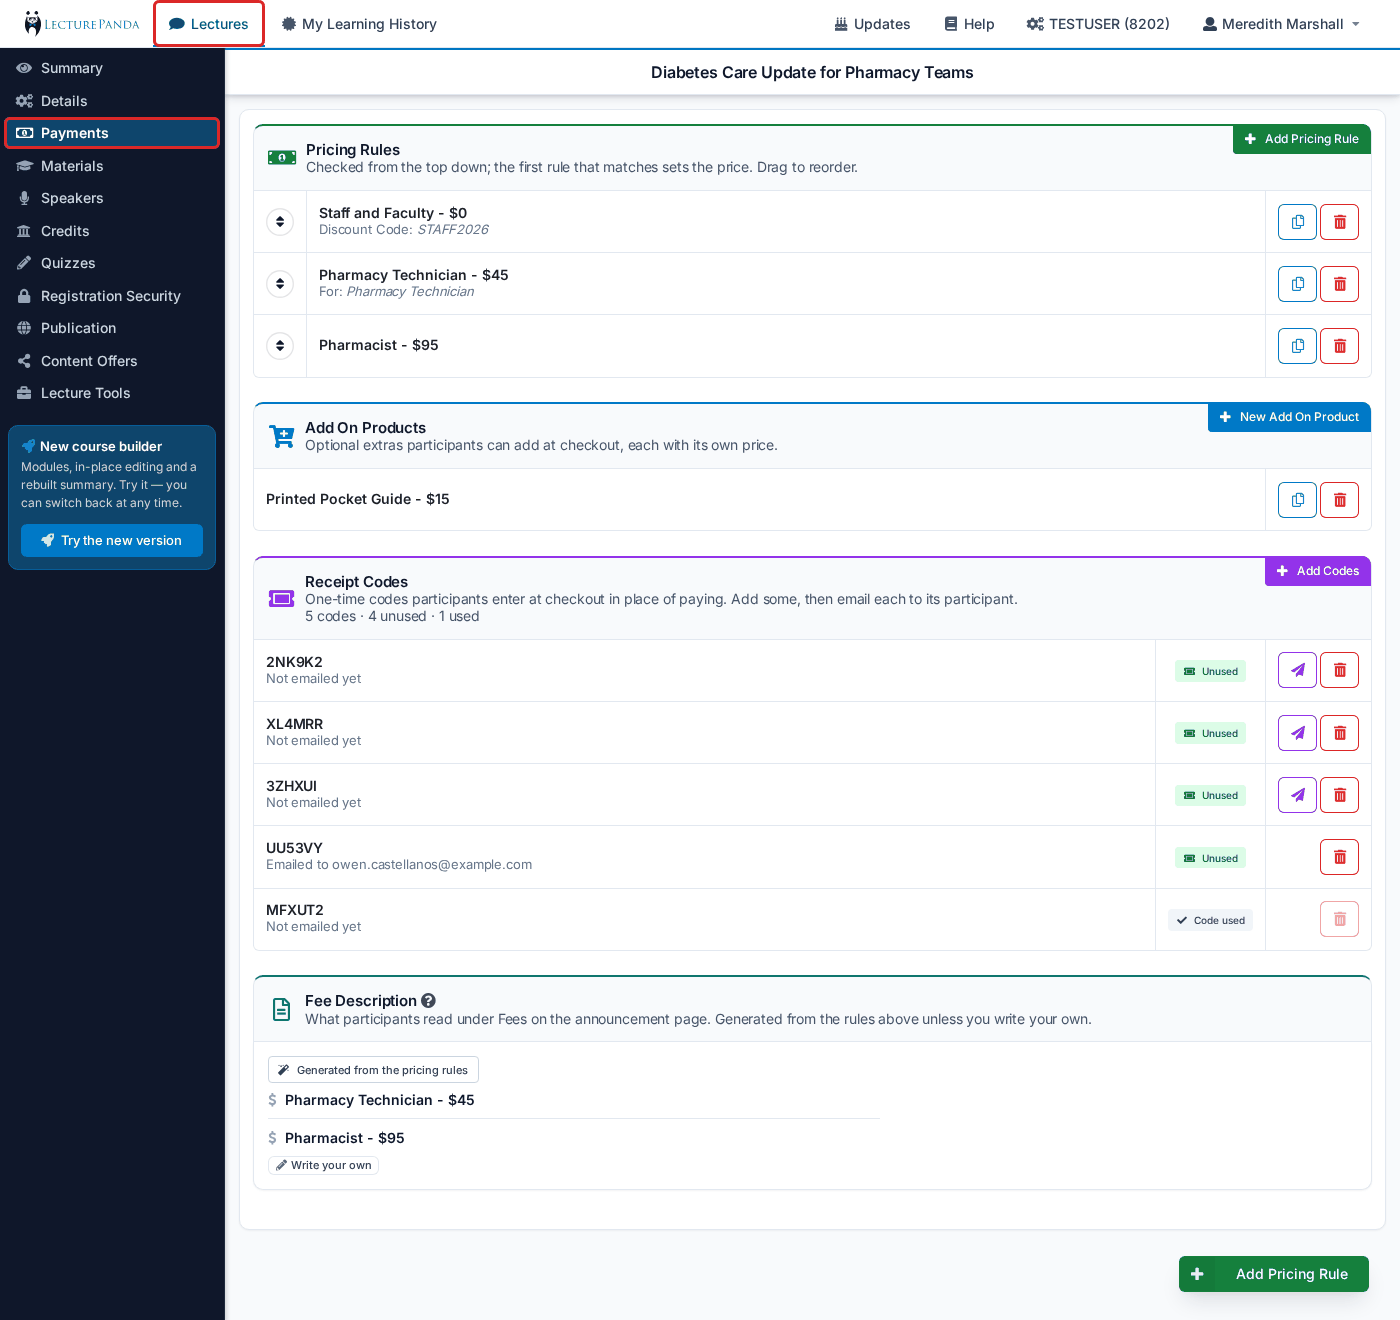
The page has four sections, top to bottom: Pricing Rules, Add On Products, Receipt Codes and Fee Description. Until the course has a pricing rule it shows No pricing rules yet. Participants will not be asked to pay during registration., and the Add On Products and Receipt Codes sections are greyed out.
Creating a Pricing Rule
Use the green Add Pricing Rule button at the bottom right, or Add Pricing Rule in the corner of the Pricing Rules section, to create a new pricing rule.
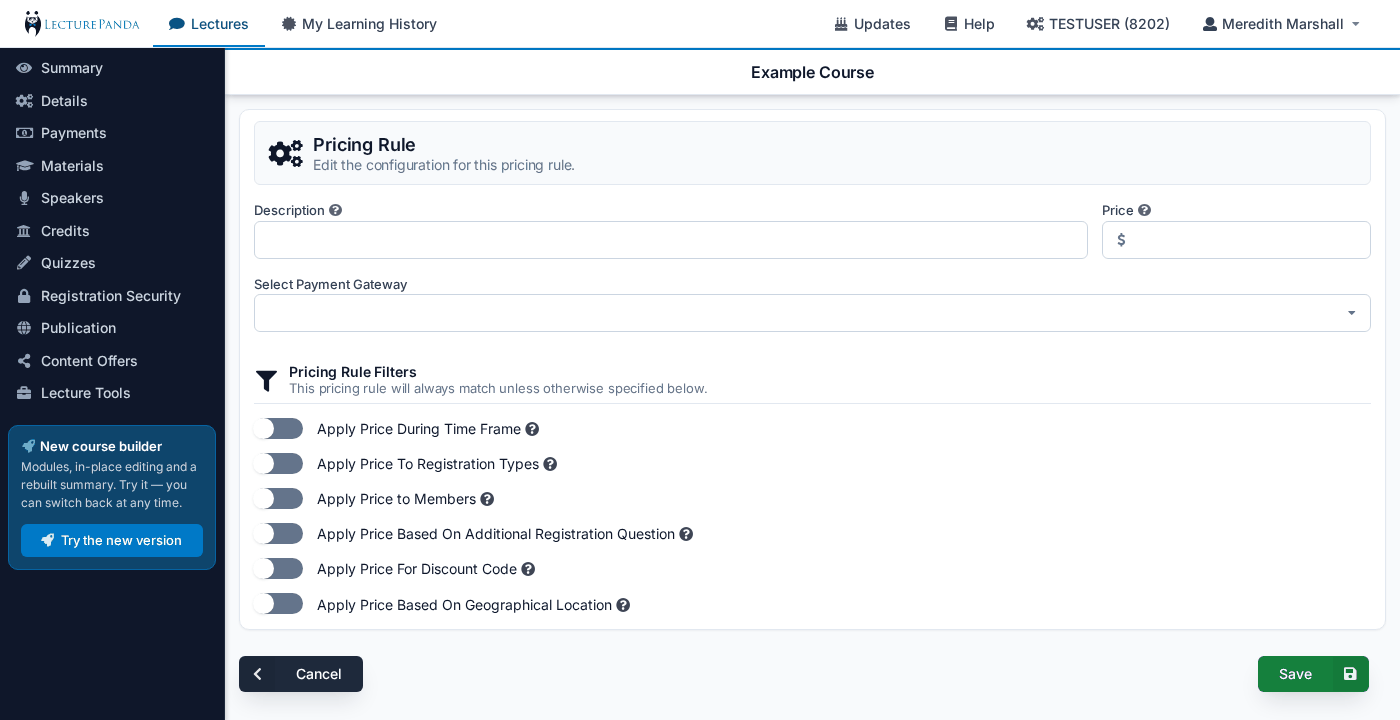
Description
The description of the pricing rule. This description will be visible to registrants.
Price
Enter the registration fee.
Select Payment Gateway
Define which of your payment platforms will process registration charges.
INFO
You can define your payment gateways in Payment Processor settings.
Pricing Rule Filters
When creating pricing rules with more than one filter, ALL of the filter criteria must match for the pricing rule to be applied to a participant. If any of the filters do not match, the software will move to the next pricing rule to see if there is a match. For example, if you create a rule that applies to a specific time frame and a specific registration type, registrants must meet BOTH of these requirements to have the pricing rule apply to them.
- Apply Price During Time Frame: This price is only available between the Start Date and End Date you set. (Ex. Early Bird Special)
- Apply Price To Registration Types: This price only applies to specific registration types. Additional registration types can be defined here.
- Apply Price to Members: This price only applies to registrants that are part of the selected membership database. Additionally, a second layer of filtering can be added here to have pricing only apply to selected membership type(s). Membership databases can be managed here.
- Apply Price Based On Additional Registration Question: This price only applies if the registrant gives a specific answer to an additional registration question. Additional registration questions can be added here.
- Apply Price For Discount Code: This price only applies to registrants that enter the Discount Code you define. Discount Code Max Uses caps how many times the code can be used — leave it blank or set it to 0 for no limit. Rules with this filter are hidden from the automatic price descriptions that are generated for your Announcement page.
- Apply Price Based On Geographical Location: This price only applies to registrants in the regions you select. Location is approximated from the registrant's IP address at the time they register, so treat it as a strong hint rather than proof of residence.
NeonCRM
With a NeonCRM account connected, a rule whose gateway is not NeonCRM also offers Select Neon Account To Mirror Data — see the NeonCRM guide.
Managing Pricing Rules
After creating a pricing rule Admins can see an overview of all of the pricing rules and associated filters that have been created.
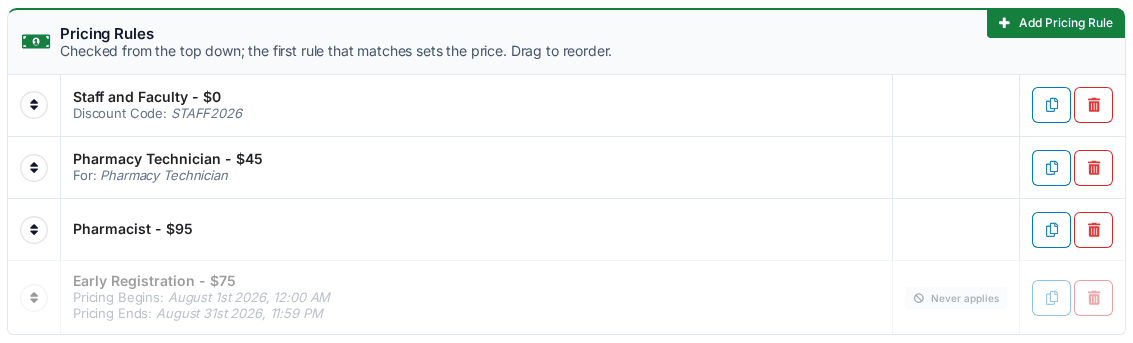
Click a rule to open it. Each row also has a copy button, to use an existing rule as the starting point for a new one, and a delete button. Drag a rule by its handle to change the order the rules apply in.
WARNING
Pricing rules are evaluated in order from top to bottom, and the first matching rule is applied. Place your most specific rules (discount codes, early bird pricing, member rates) at the top, and your general/default pricing at the bottom. If a catch-all rule appears above a discount code rule, the discount will never trigger.
Seeing "No Default Price Rule Found!"
Your last rule still has filters on it, so anyone matching none of your rules would register free. See Pricing Rules for how to clear it.
Seeing "Discount Code Rules Are Not At The Top!"
A rule with a discount code is listed below a rule without one, so the rule above is applied first and the code never takes effect. Drag your discount code rules to the top of the list.
Unreachable rules
Rules are checked from the top down and the first match wins. A default rule (one with no filters) matches everyone, so any rule listed below it can never apply: those rules are greyed out, marked Never applies, and a warning at the top of the page says how many. Drag them above the default rule, or delete them, so the default rule is listed last.
Add On Products
Optional extras a registrant can buy alongside their registration — a printed workbook, a boxed lunch, a recording bundle.
Add-ons live in their own Add On Products section, below the pricing rules. Use New Add On Product in the corner of the section to create one. The section is greyed out — Available once the course has a pricing rule. — until the course has at least one pricing rule. Each add-on has a Name, a Price and a Description shown to the participant, and the same kind of filters as pricing rules — time frame, registration type, membership, and answers to additional registration questions — so an add-on can be offered to some registrants and hidden from others.
Unlike pricing rules, add-ons are not a funnel: every add-on whose filters match is offered, and the registrant chooses which to take. A credit can also be tied to an add-on, so buying one unlocks CE the base registration does not include — see This Credit Offered For These Addons on the Credits tab.
Receipt Codes
One-time codes participants enter at checkout in place of paying.
Receipt codes are for people who should not pay online — a sponsored seat, someone who paid by check, a guest. Each code works once.
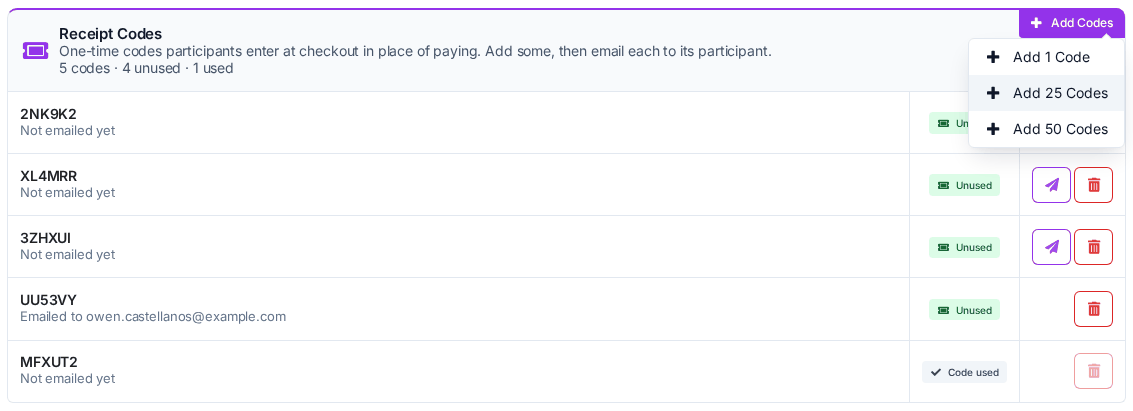
- In the Receipt Codes section, click Add Codes and choose Add 1 Code, Add 25 Codes or Add 50 Codes.
- Click the mail button on a code's row to open Email receipt code, enter the participant's email address and send. The email names the course. You can also read a code off its row and hand it out yourself.
- The participant registers as usual and enters the code at checkout instead of paying.
Each row shows whether the code is Unused or Code used, and Emailed to … with the address once you have sent it (Not emailed yet until then). The list shows the first five codes; Show all … codes expands it. A code that a participant has already registered with cannot be deleted.
The section is greyed out — Receipt codes stand in for a payment — add a pricing rule first. — on a course with no pricing rules, because there is nothing to pay.
See Codes & Free Registration for when to use a receipt code rather than a discount code or a registration code.
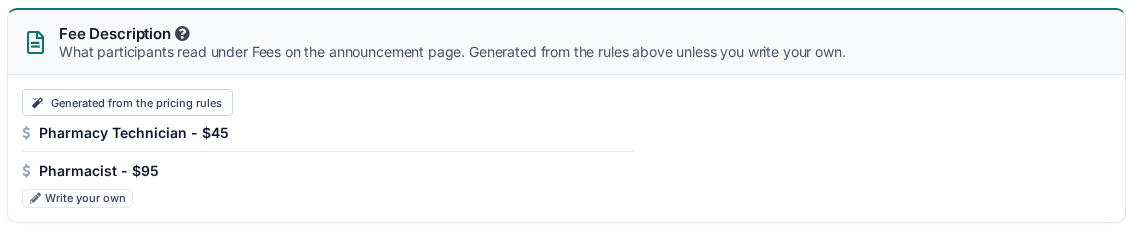
Fee Description
The last section of the page is what participants read under Fees on the announcement page.
- With nothing written, it shows the text LecturePanda generates from your pricing rules, labelled Generated from the pricing rules. It changes by itself whenever the rules change.
- When the rules cannot express your pricing, click Write your own, enter your text and save. Your text then replaces the generated pricing on the announcement page, and the section is labelled Custom text replaces the generated fees on the announcement page. Use Edit to change it.
- Use generated text deletes your text and goes back to the generated pricing. It asks first — Discard your custom text? — because this cannot be undone.

Related guides
- Pricing Rules — how the funnel decides a price, ordering rules, and what to check when one doesn't apply
- Codes & Free Registration — discount codes vs. receipt codes vs. registration codes, and how to make a course completely free
- Registration Payments & Receipts — how funds reach your bank account, receipts, and refunds
- How Billing Works — what each registration costs you