
Appearance
Getting Started
Welcome to LecturePanda! This guide gives step-by-step instructions to help you create and facilitate the best lecture experience through LecturePanda.
Two versions of the course pages
The steps below name the tabs of the classic pages, which is what you see until you choose otherwise. If you have switched to the new course builder (Try the new version, at the bottom of a course's menu), each step has a note saying where the same thing is there. The Course Builder has the full map, and you can switch in either direction at any time.
1. Create your first Lecture
Log in to your LecturePanda account and navigate to Lectures > Add Lecture
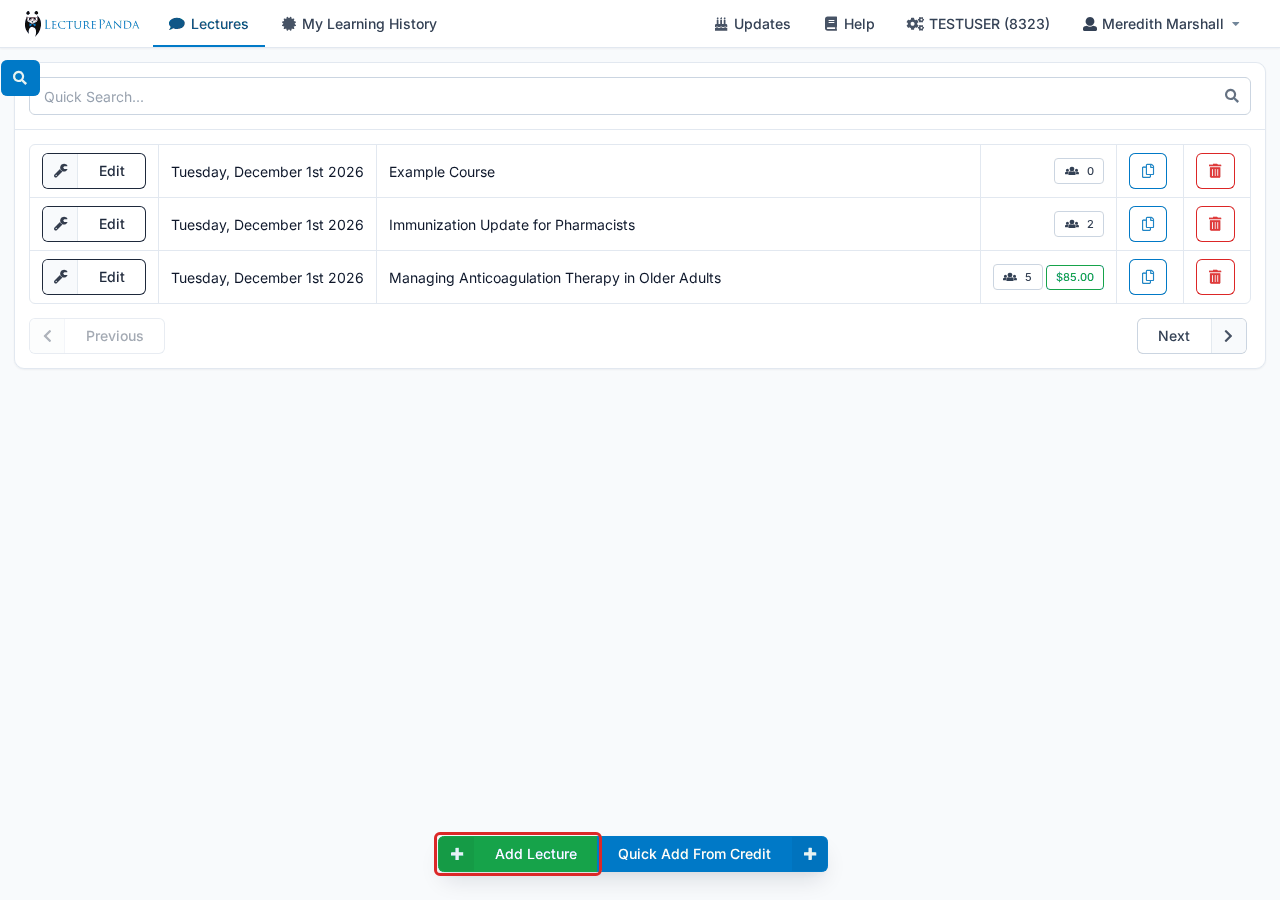
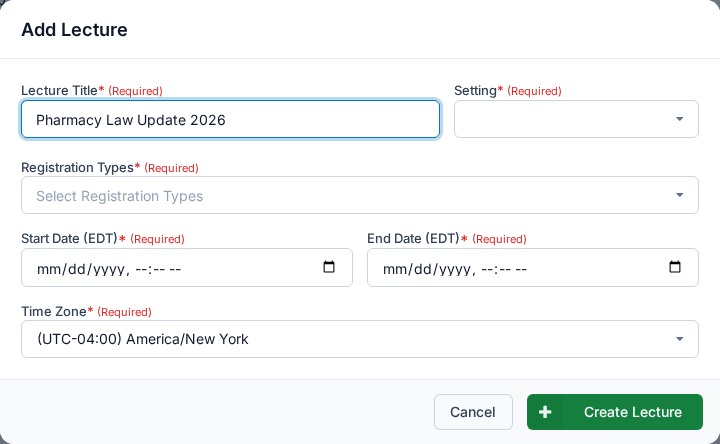
A small dialog asks only for the essentials — the title, setting, registration types, start and end dates, and time zone. Click Create Lecture and you land on the new lecture's Summary page. The rest of the lecture's details — and the title, registration types, dates and time zone you just entered — are on the Details tab.
INFO
Click here for an in-depth guide on adding lecture details.
In the course builder
The title, description and time zone are on Course Details. The setting, dates, location and webinar belong to the course's module — open it under Course Content (Course Modules).
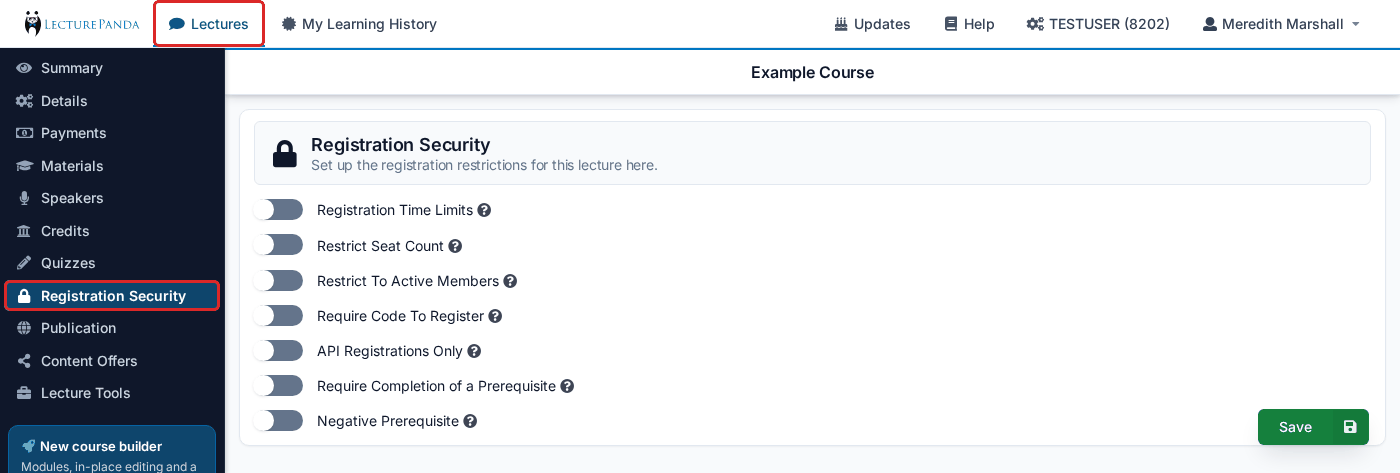
2. Set up Your Registration Security (Optional)
Set any registration restrictions for the lecture based on time frame, email address, or special code. These live on the Registration Security tab. In the course builder they are on Registration › Security.
INFO
Click here for an in-depth guide on Registration Security.
3. Choose Payment Options
LecturePanda integrates with many payment processors to allow you to collect fees from your participants via any major credit card as they register. Our recommended payment processor is Stripe.com (a secure third party payment processor, similar to PayPal) since using them will also give you access to our marketplace features. In this guide, we'll use Stripe to process the credit card payments and deposit the funds directly into the bank account specified. However, you would follow similar steps with any of the other supported payment processors. If you don’t yet have a Stripe account, it only takes a few minutes to create an account.
After setting up your Stripe account, connect it to your LecturePanda account. Navigate to Organization Settings > Stripe > Add Stripe Account
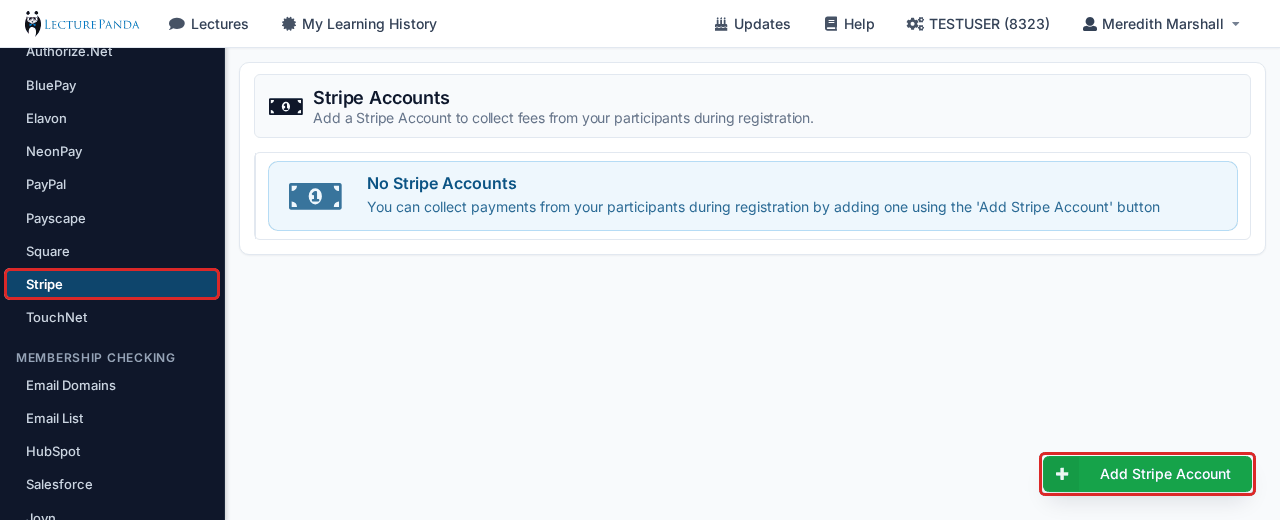
You will be taken to the page where you can sign into your Stripe account. Follow the instructions on this page. You will need to provide a routing number and account number for your bank. This is where money earned will be deposited.
You will then be redirected back to your LecturePanda Account Page. You can verify your Stripe and LecturePanda accounts are linked by navigating to Stripe in Organization Settings again.
Connect Stripe to Your Lecture
Once you have a Stripe account connected to LecturePanda, you can enable this payment option on the Lecture by doing the following:
- Go to the Lecture you want to enable payments on.
- Select the "Payments" section on the left. (In the course builder: Registration › Pricing.)
- Create/Edit a Pricing Rule
- Use the "Select Payment Gateway" field to select your account.
INFO
Click here for an in-depth guide on creating Pricing Rules.
4. Select Registration Types
Each lecture can have multiple "types" of participants called "Registration Types". Registration Types offer the following flexibility:
- Each registration type has a different registration form. This means that you can ask different questions to different types of participants. For example, you could collect a student ID number from a "Student" registration type and a driver's license number and a date of birth from a "Non-Student" registration type.
- Each registration type can have its own set of quizzes/surveys defined.
- Each registration type can have its own set of credits available to claim.
- When collecting fees, each registration type can have a different price.
- Registration types can be grouped on the registration report.
LecturePanda provides some default registration types so you can get started quickly. You chose the lecture's types when you created it. To change them, open the Details tab and use Select Registration Types. In the course builder they are on Registration › Form, in the Audience section — click Add a registration type.
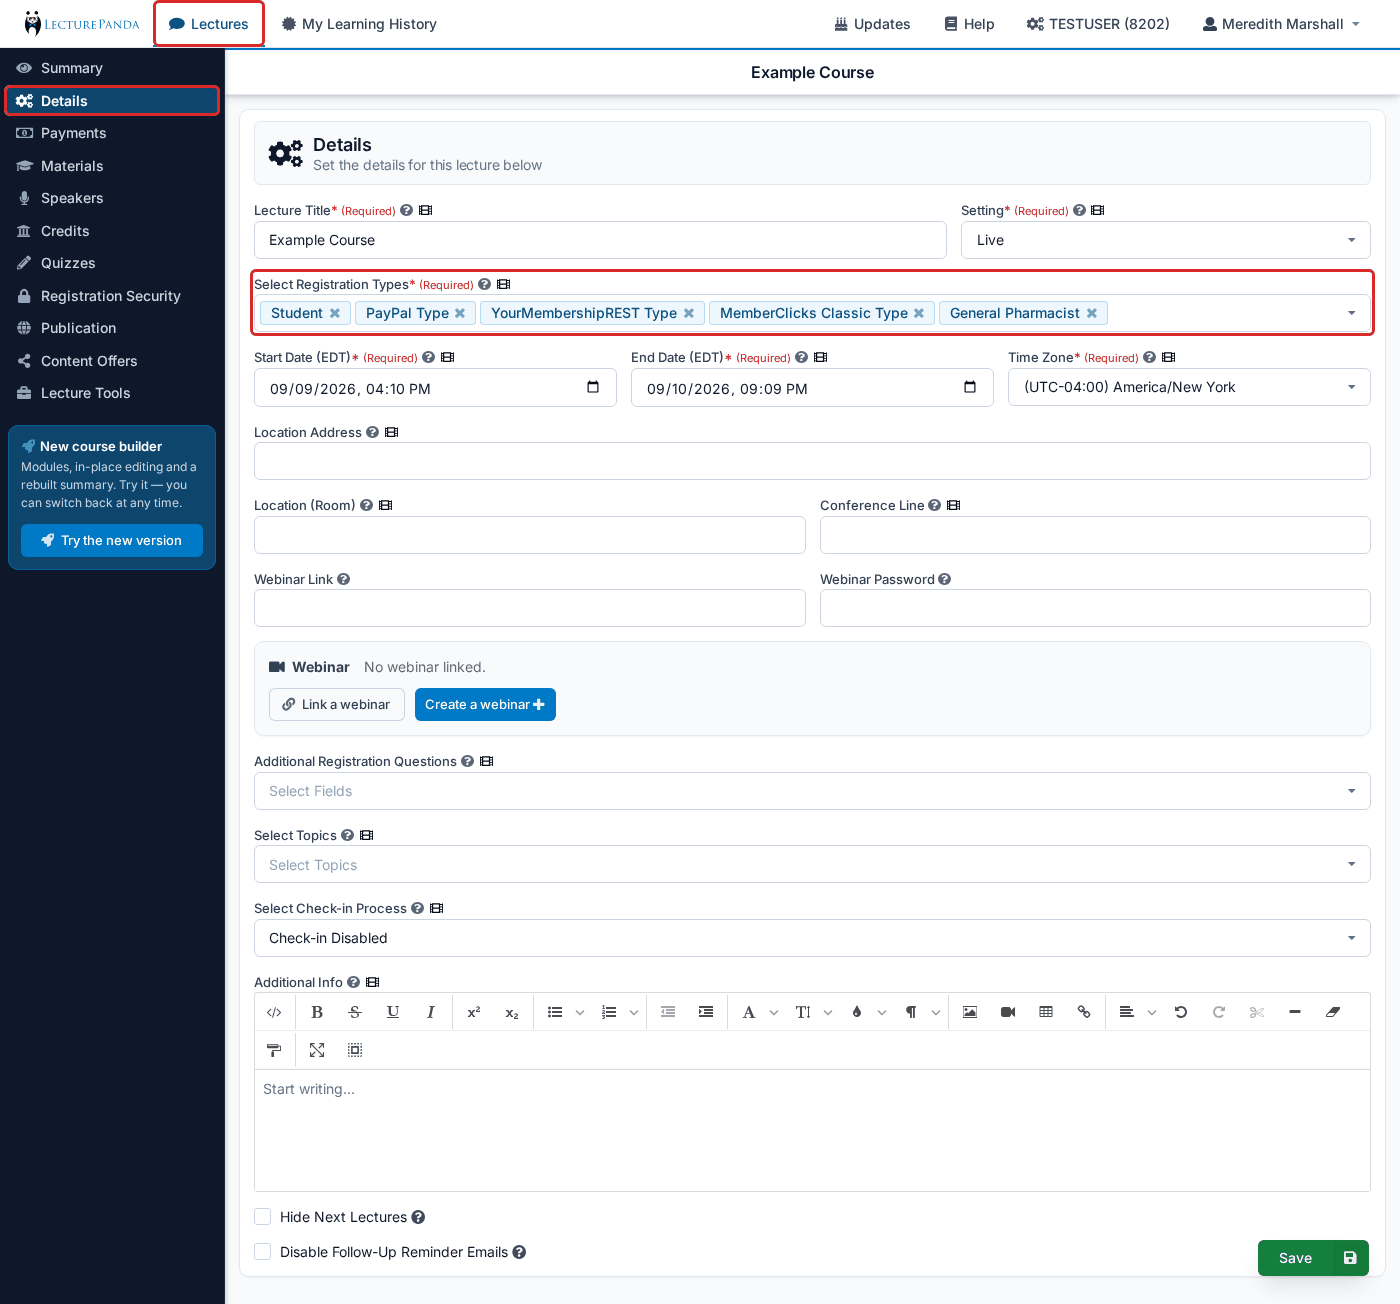
You can also create your own customized Registration Types so LecturePanda fits exactly with your needs.
INFO
Click here for an in-depth guide on creating additional Registration Types.
5. Add Your Speakers
Adding speakers to your lecture gives your presenters the ability to access the Audience Response System.
To add a Speaker, navigate to the "Speakers" tab on the left and click the "Add Speaker" button. In the course builder, speakers are a section of Course Details — click Add speaker.
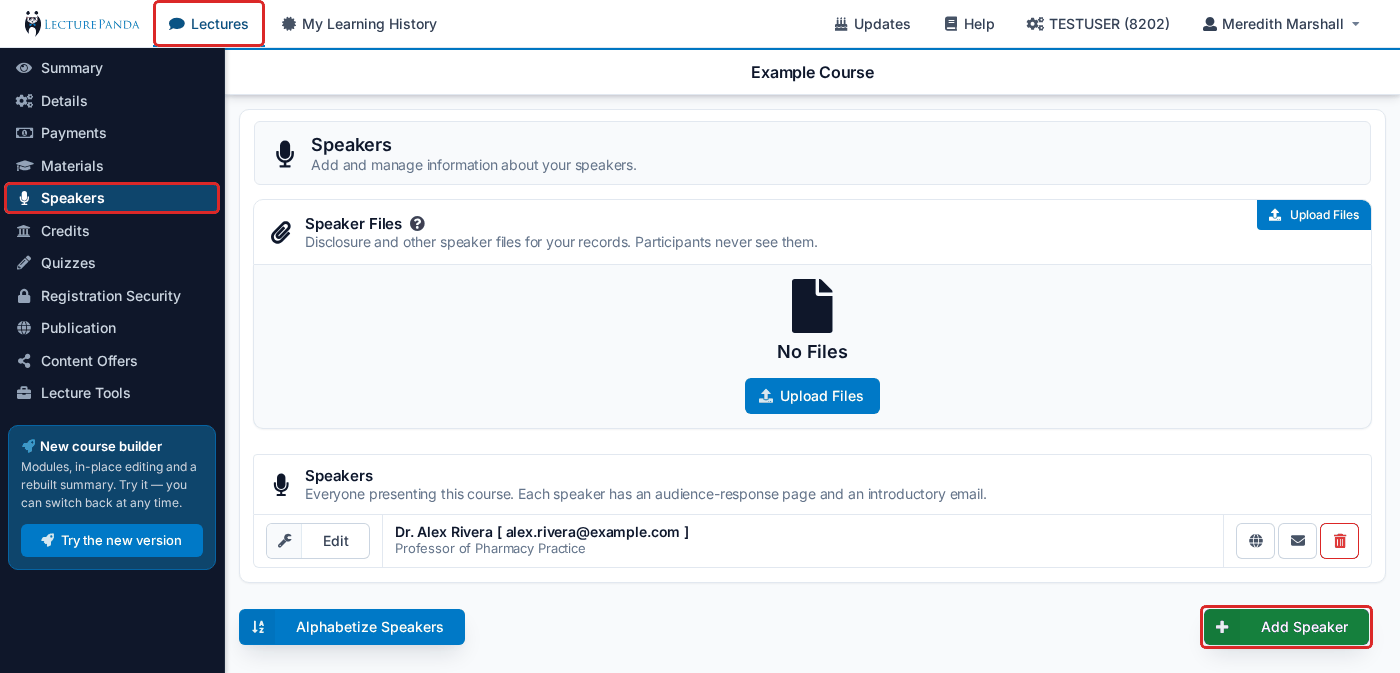
After clicking "Save", you will be asked if you would like the speaker to be notified via email. This sends the Speaker a 'welcome email' with a link to the Audience Response portal.
INFO
Click here for an in-depth guide on adding speakers and the Audience Response portal.
6. Add Credits to Your Lecture
Define the credits and certifications that can be awarded to your attendees upon completion.
Navigate to the "Credits" tab on the left, and click the "Add Credit" button. In the course builder, credits belong to a module: under Course Content, open the module and click Credits, then Add Credit.
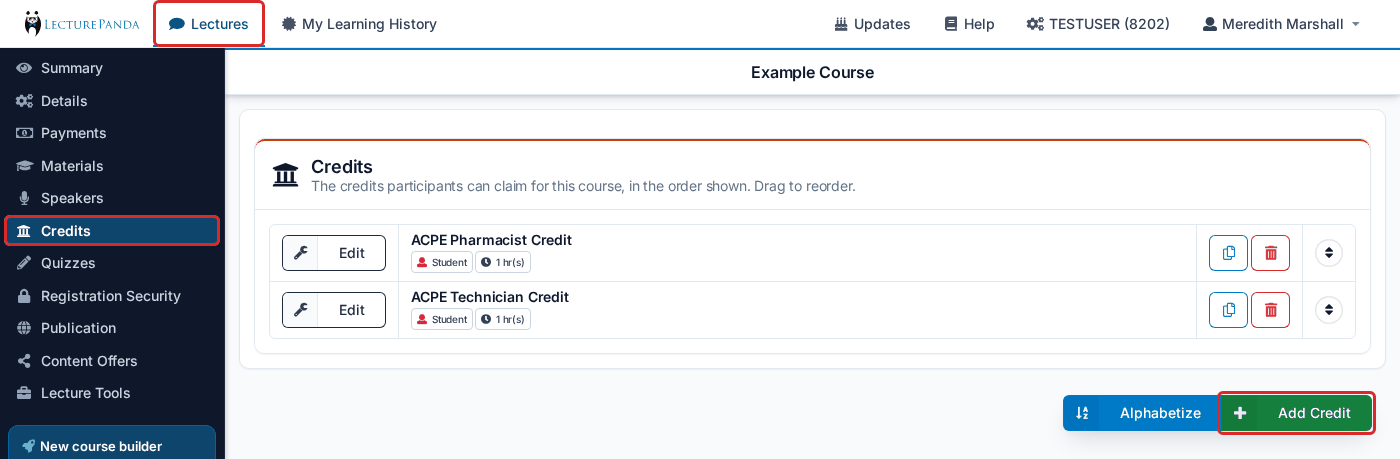
After creating your credit, you will see it listed in the Credits tab for the respective lecture.
INFO
Click here for an in-depth guide on creating Credits.
7. Add a Quiz or Survey
LecturePanda allows you to create quizzes and surveys that are associated with your lectures.
Navigate to the "Quizzes" tab on the left, and click the "Add Quiz" button. In the course builder: under Course Content, open the module and click Quizzes, then Add Quiz.
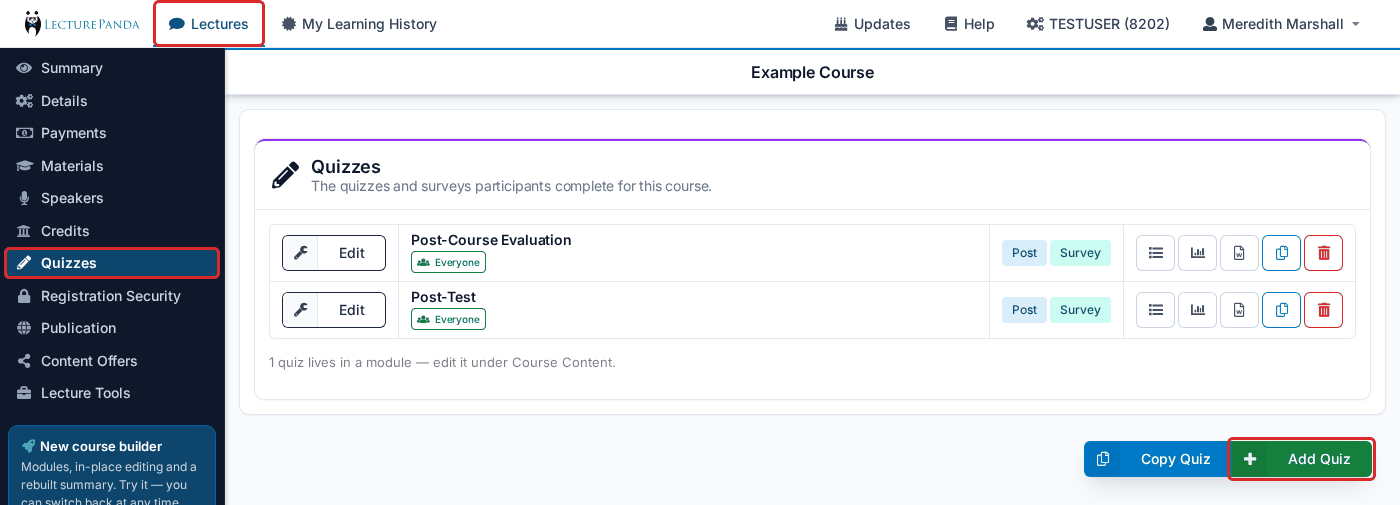
Enter all relevant quiz information and questions and select when participants should take this quiz.
INFO
Click here for an in-depth guide on creating Quizzes.
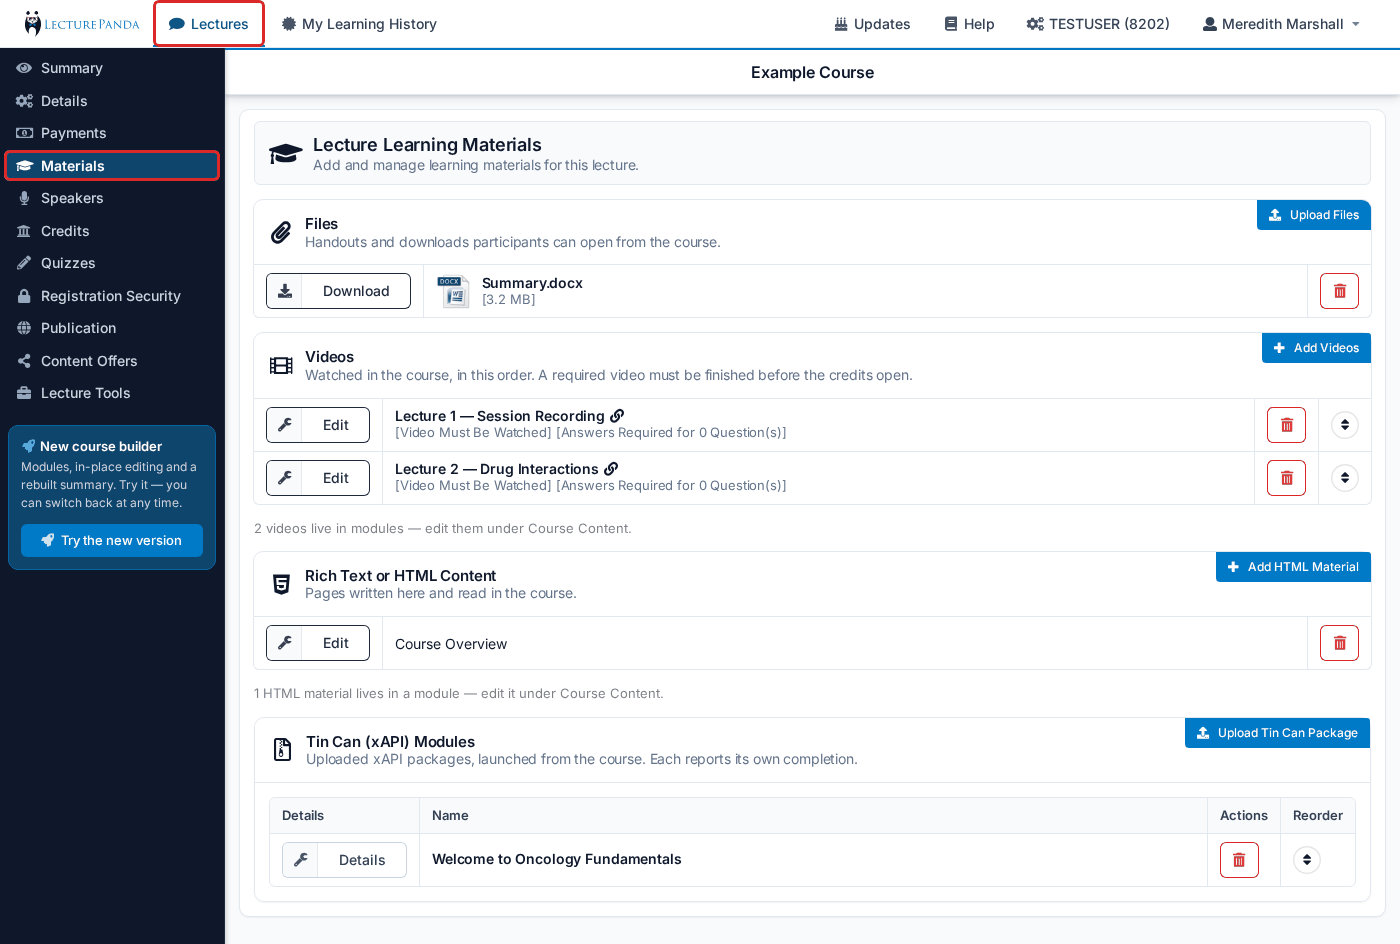
8. Upload Learning Materials
Add files and videos for your participants to access.
Navigate to the "Materials" tab on the left to begin adding files and videos to your lecture. In the course builder: under Course Content, open the module and click Materials, then Add Material. See Course Modules.
INFO
Click here for an in-depth guide on adding materials.
9. Publish the Lecture
LecturePanda allows you to publish your lectures into a catalog. Each catalog has a public listing of all the lectures. Catalogs can also be configured to automatically send reminder emails about upcoming lectures to participants.
Navigate to the "Publication" tab on the left (in the course builder: Publication › Catalogs) and add the lecture to any Publications by clicking "Published". If there are currently no Publications, you can create one by clicking the "Add Catalog" button and filling out the catalog information.
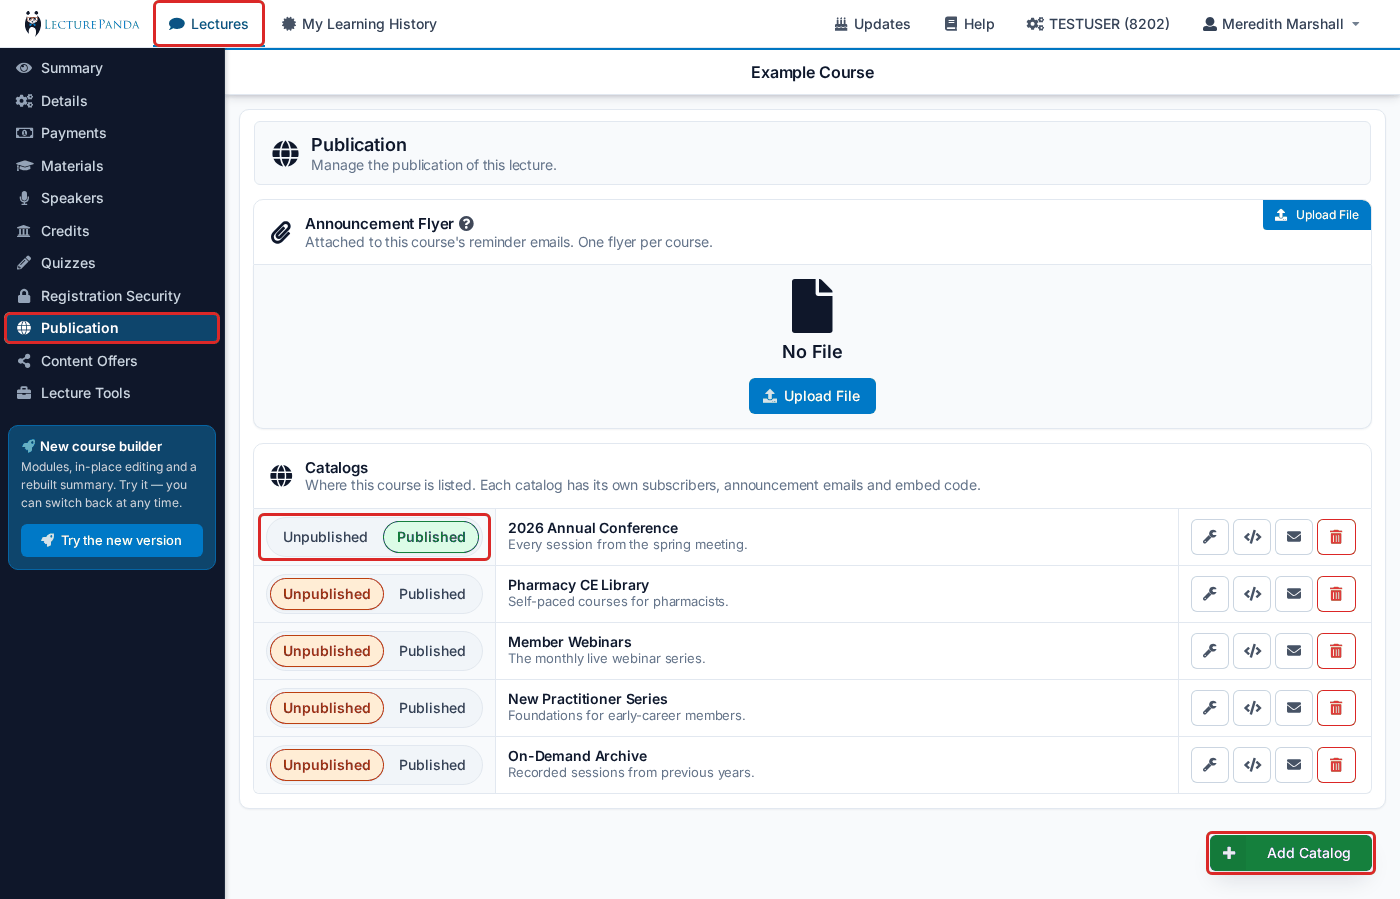
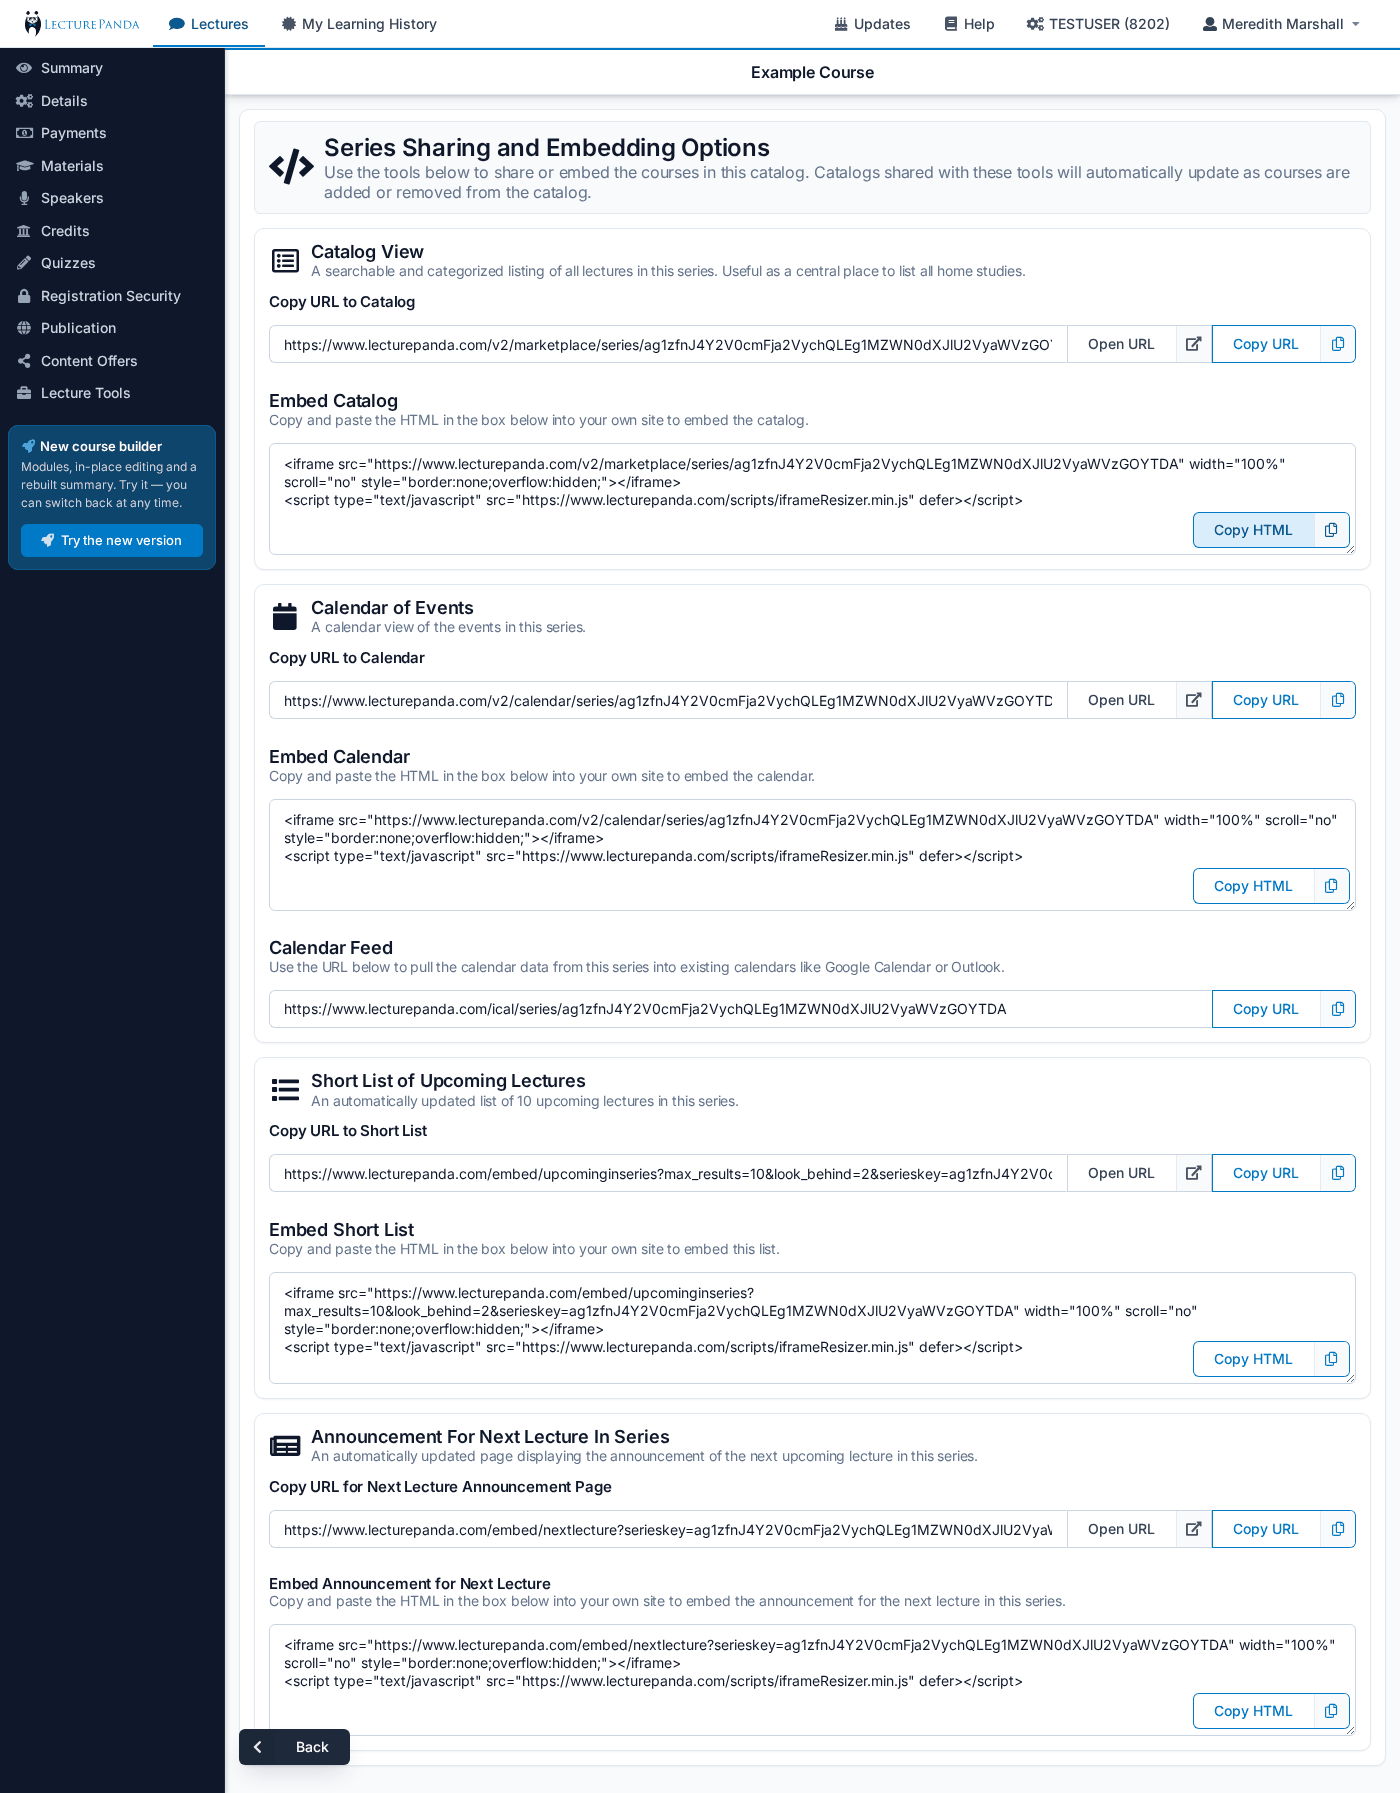
Now that you have a Publication with at least one Lecture in it, you can embed your Publication on your website so participants can register for your lectures. Click the "</>" button next to the Publication to access your embed links.

INFO
Click here for an in-depth guide on Publications.
Reminder emails are automatically generated for upcoming lectures in a catalog. The reminder emails are generated based upon the "Reminders" setting for the catalog. If you have a "Flyer" file attached to the lecture it will be included as an attachment in the reminder email. Upload it under Announcement Flyer — at the top of the Publication tab, or, in the course builder, on Registration › Experience.
The emails list for the reminders for each catalog can be found here. Once there, look for the distribution list with the same name as the Publication. Emails can be deleted or added to the distribution list from here. Additionally, participants can subscribe to reminder emails on the catalog's public listing page.
Where to Go Next
Now that your first lecture is built, these are the pages most people need next:
Building bigger courses
- Course Modules — split a course into modules, each with its own dates, place, content and credits
- The Course Builder — what it is, how to switch, and where each classic setting lives in it
Planning your catalog
- Structuring a Course — one course or several, and why that decision is hard to undo
- Moving Content Into LecturePanda — video hosting, importing quiz questions as text, and how much to build before you launch
Getting paid
- How Billing Works — your annual subscription and your participant bank
- Pricing Rules — member rates, early bird, discount codes, and why order matters
- Registration Payments & Receipts — where the money goes, receipts, refunds
- Codes & Free Registration — discount codes, receipt codes, and free courses
Running your courses
- Managing Registrations — links, resending access, removing participants
- Admin Access & Permissions — adding colleagues and choosing what each can reach
- Finding a Learner — looking someone up on a course or across your account
- Common Learner Issues — the fixes for what learners email you about
If you report to an accreditor
Certificates, tracking, and completion reports work without any of this — connect an accreditor only if you file completions with one.
- Accreditation & Reporting — what can be connected, and which pages apply to you
Book a walkthrough
If you'd rather be shown than read, we're happy to walk through your setup live — get in touch.