
Appearance
Security
Registration › Security: who may register at all, and the access codes you hand out.
This page is for the course builder
It describes the Security page in the Registration group, which you see after switching with Try the new version. On the classic pages the same controls are the Registration Security tab. See The Course Builder for the full map.
The page has one section, Registration Security, and a second — Access Codes — that appears while the unique sign-in codes rule is on. Everything here is optional. With no rules the section reads "No security enabled. Anyone with the link can register."
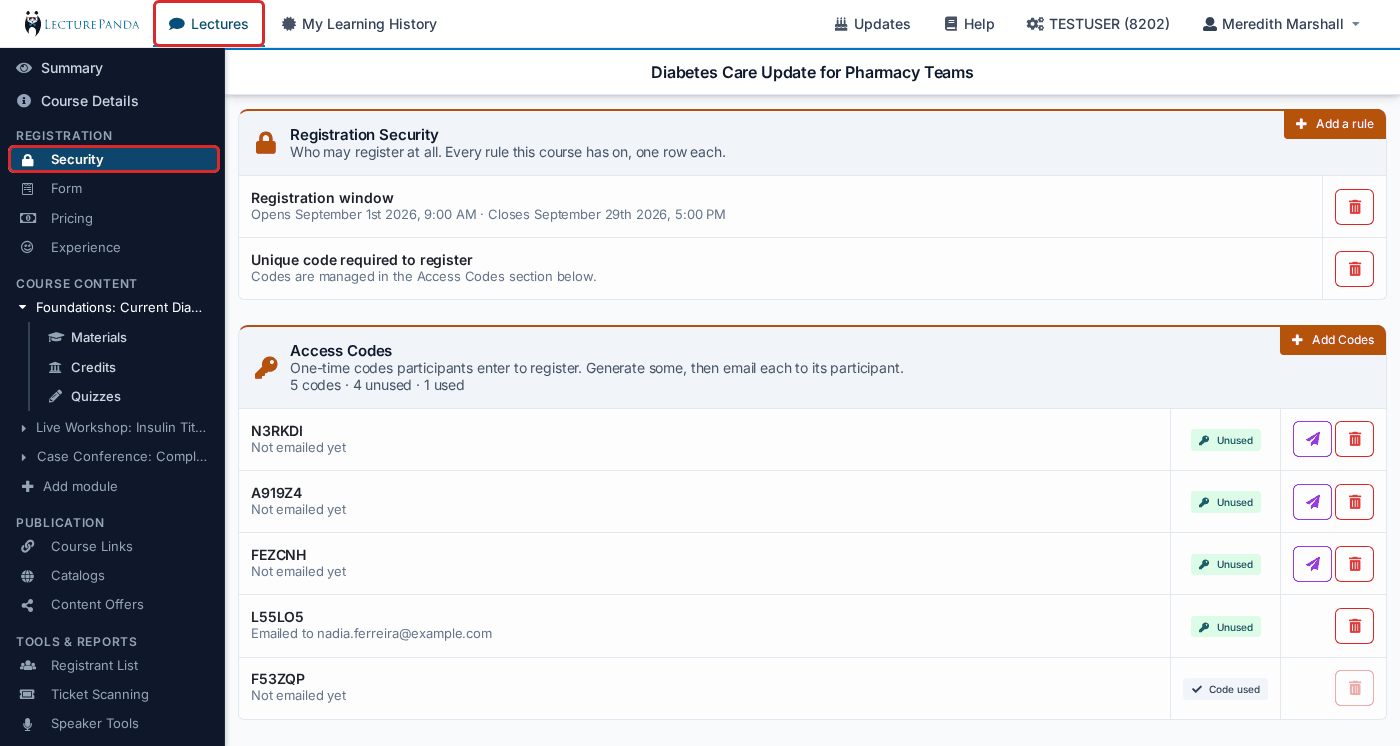
Registration Security
"Who may register at all. Every rule this course has on, one row each."
- Adding a rule — click Add a rule in the corner of the section and pick the kind of rule. A rule that needs details opens a dialog; fill it in and click Save. A course can have one rule of each kind, so the menu only offers the kinds that are not on yet.
- Changing a rule — click its row.
- Removing a rule — click Remove on the row and confirm. Anyone the rule kept out will be able to register.
The rules
Registration window
Registration opens and closes at set times. Fields: Registration Opens On and Close Registration On. A new rule starts from now and, if the course has not started yet, closes when it starts. The Summary and Course Details pages show the result as a chip — "Registration open until…", "Registration opens…" or "Registration closed".
TIP
Even if your course is an enduring event, we recommend putting a close date so that years from now you don't need to remember to turn off the course.
Seat limit
Only so many participants may register. Field: Seat Count. Once the limit is reached, nobody new can register.
Email domains
Only emails from the listed domains may register. Field: Email Domain List — add each domain in turn. This rule is only offered in the course builder.
Membership
Only active members of a connected membership database may register. Field: Membership Account. The rule is offered only when your account has a membership connection — see Membership Checking.
Unique sign-in codes
Each participant needs a unique code to register. The rule has no fields of its own: turning it on makes the Access Codes section appear below, and that is where the codes are made and sent.
WARNING
This is an access gate, not a discount. If you want to give people free or reduced-price registration, use a discount code or receipt code instead — see Codes & Free Registration.
API-only registration
Participants are registered by a third-party system, never by the registration page. Field: Third Party Sign Up Page — the address participants are sent to when they try to register. The other system registers them using the Basic Auth credentials from your account page. Use this when an association management system or another platform owns enrollment.
Prerequisite
Participants must have completed another course first. Field: Select Lecture.
INFO
The registrant must use the same email address for both courses.
Negative Prerequisite
The mirror image: participants who completed the courses you select cannot register. Field: Select Lecture (you can pick several). This is how you stop people re-registering for a course they already took — for example, blocking last year's cohort from this year's edition of the same material.
A course that was limited to an email list in the past shows a row reading Limited to an email list — "Managed outside the console." It is there so the restriction is not invisible; it cannot be changed from this page.
Access Codes
"One-time codes participants enter to register. Generate some, then email each to its participant."
The section is shown only while the Unique sign-in codes rule is on.
- Making codes — click Add Codes in the corner and choose Add 1 Code, Add 25 Codes or Add 50 Codes. Add more at any time.
- Emailing a code — click the mail button on a code that has not been sent, enter the participant's email address and click Send. The email names the course. The row then reads Emailed to address; until then it reads Not emailed yet.
- Seeing what has been used — each code is tagged Unused or Code used, and the head of the section counts them: "50 codes · 38 unused · 12 used". Codes that still need your attention — not sent and not used — are listed first.
- Deleting a code — a code that a participant has already registered with cannot be deleted.
Coming from the classic pages?
The classic Require Code To Register control asks for a number of codes up front. In the course builder the rule is just a switch, and the codes are managed here — so you can add more later, email them from the page, and see where each one went.
Related
- Codes & Free Registration — access codes vs. discount codes vs. receipt codes
- Registration Security — the classic page
- Emails LecturePanda Sends — what the access code email looks like